Sirius STAAR Assessment Bank (SSAB) & Test Builder ©2024-25 How to Use Guide: Assessment Administrators

About This Guide
This guide supports district and school administrators (DAs and SAs), along with designated assessment authoring personnel such as lead teachers, who plan to build assessments using Sirius STAAR Assessment Bank and Test Builder (SSAB) for their custom benchmarking and general testing programs.
This guide is structured around the following topics:
Review of item banks across multiple subjects and grade level bands
Creation of program course/assessment folders
Building assessments
Sharing draft assessments with colleagues prior to publishing “live”
Publishing course/assessment folders and assessments and the ability to control assessment visibility to teachers/students when needed
As a version 1 (v.1) of the application, Sirius plans additional enhancements and improvements to the functionality and user experience in both the near- and long-term. Expect updates and revisions to this guide as revisions and enhancements are made.
Additionally, this guide serves as an accompanying reference for any districts who plan to purchase SSAB and enroll in our SES 301—Building and Publishing Assessments Using Sirius STAAR Assessment Bank and Test Builder course.
Sirius Online Checklist for Administrators
Upon completion of SES 301—Authoring and Publishing Assessments Using Sirius STAAR Assessment Bank and Test Builder for Educational Leaders, along with review of this How to Use Guide, district and school assessment administrators will be able to perform the following functions:
CONTENT TAB > ITEM BANKS and PRE-BUILT TESTS: Recognize and access assessment bank and pre-built tests within the new Content tab, including search by standards or tags, or in combination with one another.
TEST BUILDER TAB > MY DRAFTS: Create a new content/assessment main folder and one subfolder to facilitate teachers’ ability to locate assessment content created by your assessment team.
TEST BUILDER TAB > MY DRAFTS: Create a first assessment and provide descriptive information about your assessment.
TEST BUILDER TAB > NEW ASSESSMENT DRAFT: Add items to your test staging bin, and then place and order them within the assessment.
TEST BUILDER TAB > NEW ASSESSMENT DRAFT: Share your new assessment with colleagues within your campus or district.
TEST BUILDER TAB > SHARED DRAFTS: Review colleagues’ shared assessment drafts.
MOVE COURSE/ASSESSMENT FOLDERS to Live and/or ADD new tests or prebuilt tests to the Live Folder (i.e., “publish” the test) for teachers to use with their classes.
ASSESSMENTS: Designate or limit visibility to teachers by confining assessments to specific dates and times.
SUPPORT TEACHERS IN TEST ADMINISTRATION: Communicate to teachers that assessments are ready.
ADD NEW ASSESSMENTS to live folders when needed.
Getting Started
Sirius STAAR Assessment Bank & Test Builder Video
Demo—Sirius STAAR Assessment Bank & Test Builder (YouTube: 6 minutes). A short, concise overview of test building using SSAB.
SSAB Test Builder Essentials Video Playlist (YouTube). Please review these more in-depth introductory videos prior to attending your hands-on training session. 6 videos; total viewing time 29 minutes.
Prerequisite Training Required Prior to Use
Assessment Builder Administrators are required to attend SES 301—Building and Publishing Assessments Using Sirius STAAR Assessment Bank and Test Builder,and to complete assignments and practice prior to official launch of the Assessment Bank product at their districts and schools. A second course, SES 302—Assessment Bank & Test Builder Follow Up, is available for districts who want to do more-advanced training to develop a deeper level of use/application, especially with regard to progress and growth reporting.
To learn more about SES 301 and SES 302, including prerequisites, please see our Professional Learning and Support Resources catalog, which includes all current professional learning courses and resources.
Following completion of SES 301, you’ll be able to build tests and publish assessment content for teachers to use in your testing programs.
Logging In
For DAs and SAs who are automatically provisioned and SSO into their accounts: please access Sirius Online via that method.
For self-registered administrators, please log in with your Username and Password at https://sirius.content2classroom.com/signin.
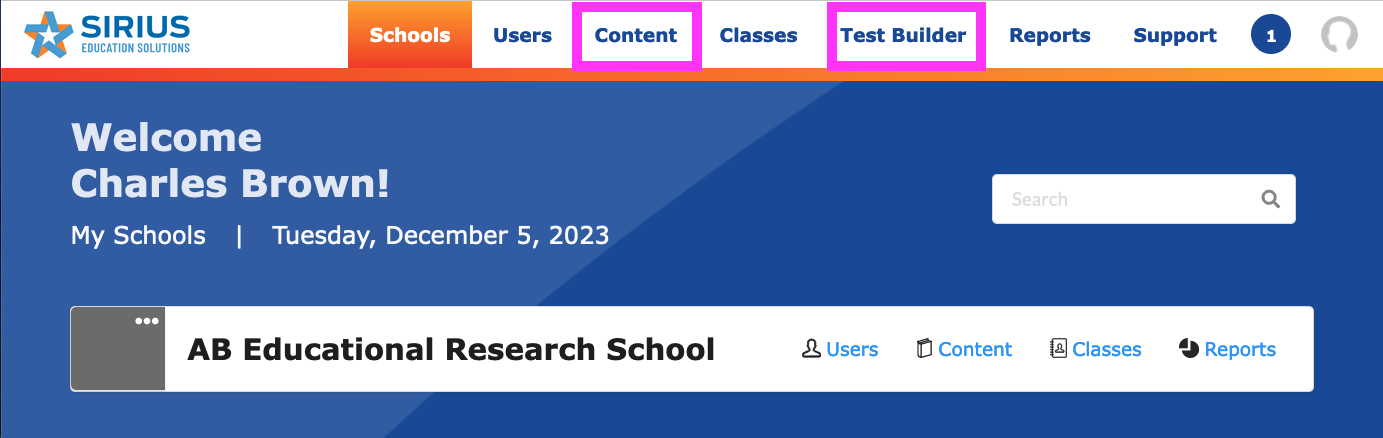
General Interface
The district or school administrator dashboard has essentially the same structure as you’ve used to date: DAs have access to the district organization and all shared schools within the district, while SAs have access to only the schools to which they are assigned (campus-wise).
The addition of SSAB to your district or school admin accounts adds two new powerful tabs: a more powerful Content tab and a Test Builder tab.
Content Tab
For DAs and SAs who are automatically provisioned and who SSO into their accounts, access Sirius Online via that method. Please note that you will receive access to both the expanded Content and Test Builder tabs prior to training.
Courses
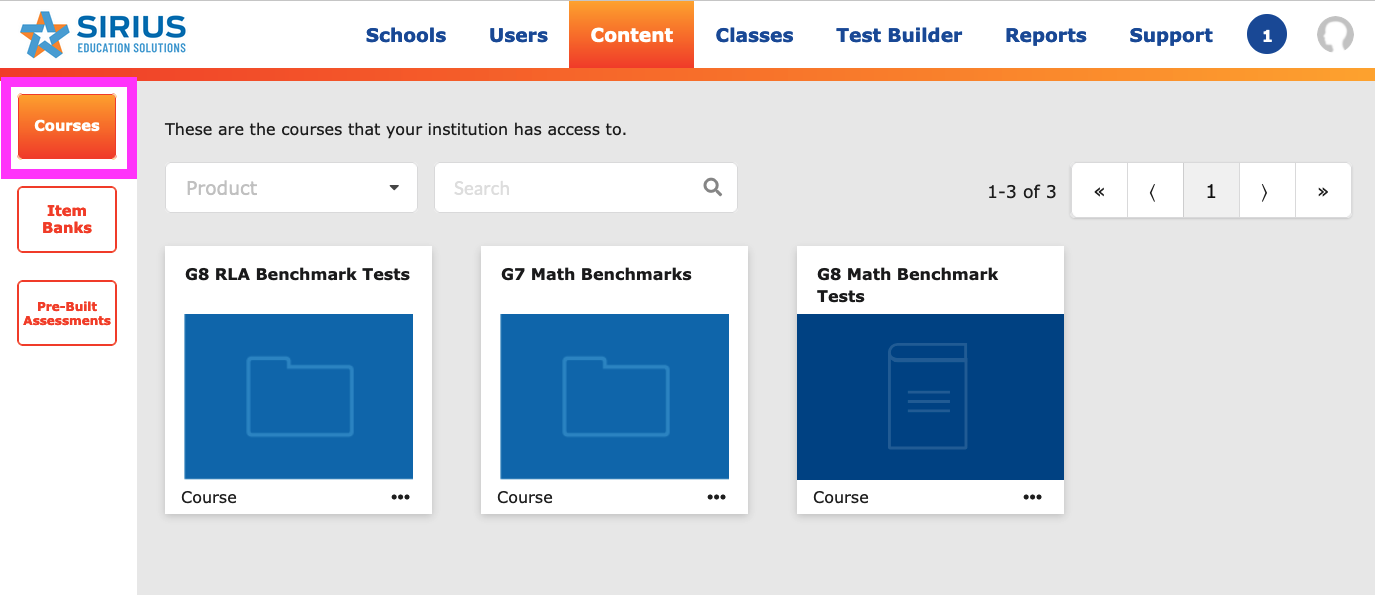
Content includes:
Purchased Sirius courses
Any “Live” main assessment folders created by assessment administrators
Item Banks
The new Content tab allows purchasers of assessment banks to see not only available Sirius courses, but also new assessment bank materials.
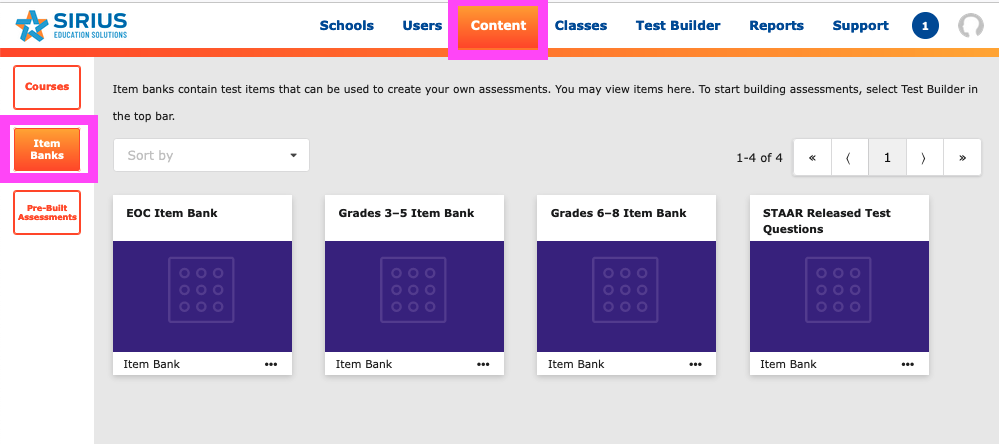
Item banks include these categories of content:
EOC Item Bank
Grades 3–5 Item Bank
Grades 6–8 Item Bank
STAAR Released Test Questions
Narrowing or filtering results within the Content tab works like your current Search Course feature. It consists of Standards search and Tags search.
To review an item bank’s contents:
Click an item bank to open it.
Filter content by Standards or Tags.
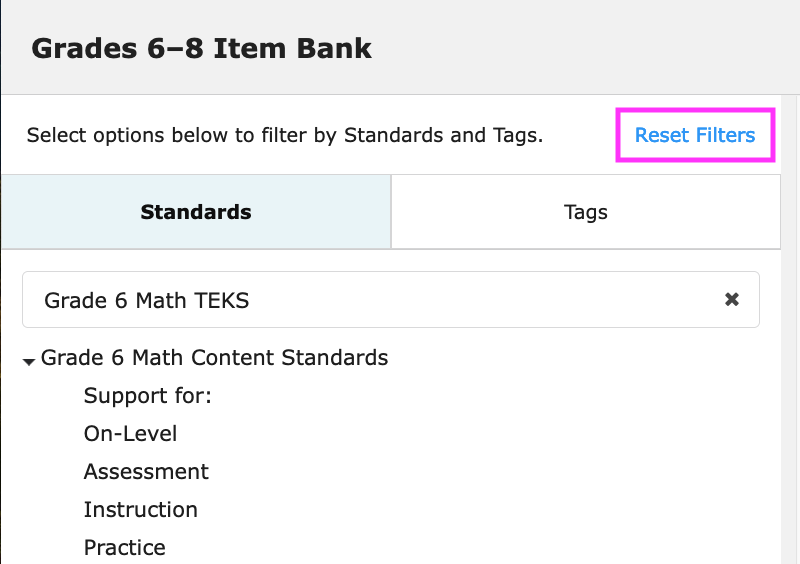
Standards Filter
When you first click on an item bank, notice that all of the questions in the bank display in the right panel.
To filter by standards:
Select a standard set such as Grade 8 RLA TEKS from the pulldown menu.
Items for the corresponding course display in the right results panel.
Click one or more checkboxes next to standards to reveal questions/items or passages that correlate to that standard.
Items associated with the standards you selected appear in the right results panel of the screen.
Item Review
You can peruse individual items by clicking them individually to preview them in their entirety, or to preview or learn more (+More) information about each item .
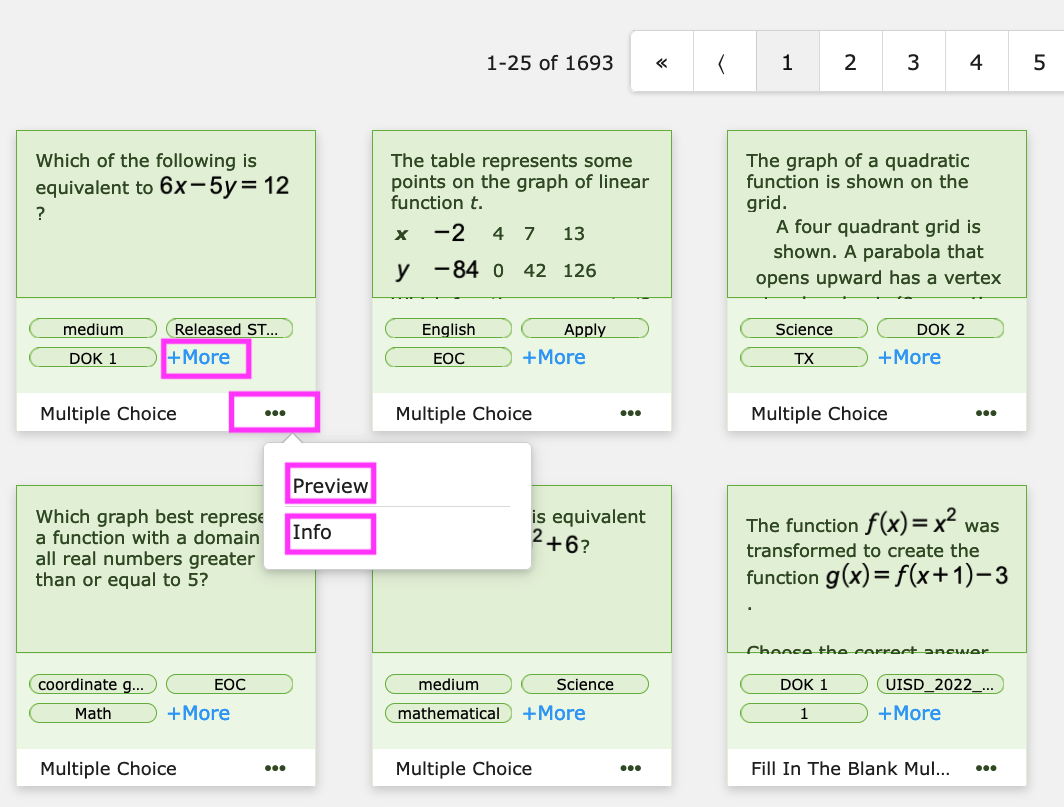
Click +More or Info in the meatball kabob (...), to review relevant metadata about each item, including:
Question stem
Standard(s)
Tags: Grade, Subject, STAAR Item Type, Language, and Point Value
System Information
Note: You can exit the pop-up information panel by clicking the “X” in the upper-right corner of the panel.
Click Preview in the meatball kabob to see the item live.
Select a grade-level test template (so that the correct tools appear in the interface of the course/grade level) and then click Close.
Once you review the working item, click Exit from the upper-right corner to return to your results screen.
You can explore other standards and questions within this screen.
Note: If you’d like to reset your filters to “start fresh,” click the Reset Filters link at the top of the search panel, otherwise your searches narrow based on your first and subsequent menu selections across both Standards and Tags.
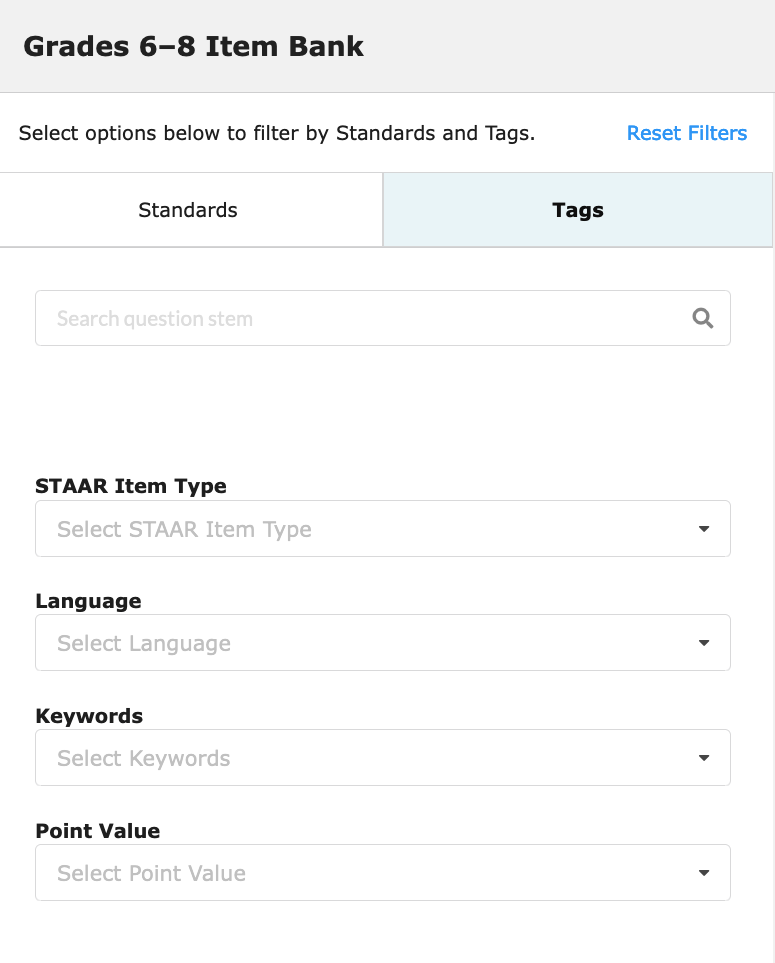
Tags Filter
The Tags Filter allows you to search or filter item content by:
Semantic or word search of question stems
STAAR Item Type, including all new STAAR 2.0 item types
Language: English, Spanish, or both English/Spanish
Keyword
Point Value: Items worth one or more points
To reveal items in the results panel, first provide search terms such as words in item stems or other criteria that you’ve selected from the pulldown menus.
Pre-Built Assessments
SSAB Admins can preview any pre-built assessments from the Pre-Built Assessments sidebar button. Content is presented by grade level according to your purchase and grade level band.
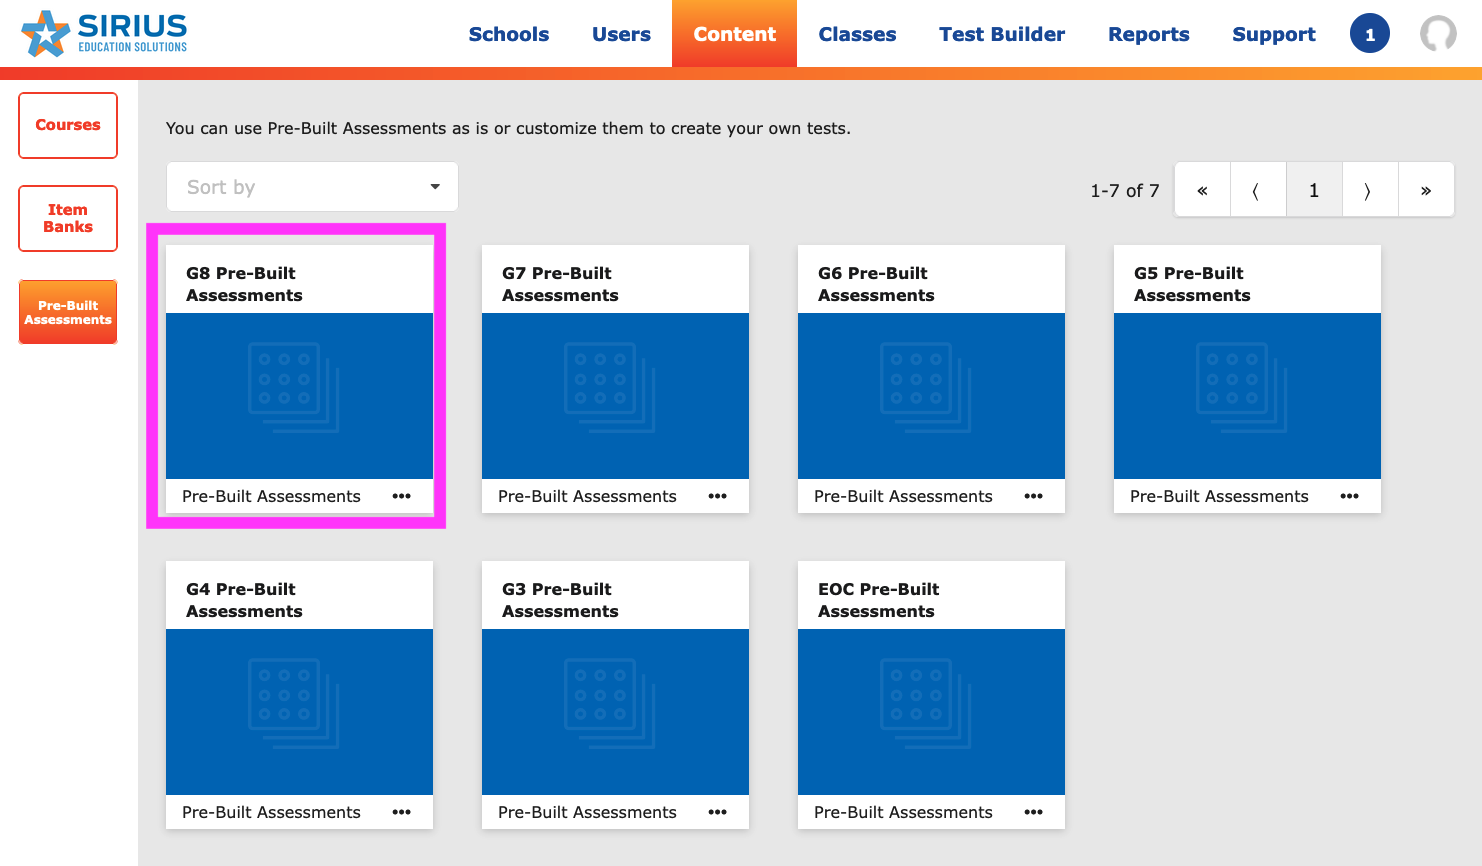
To view contents, double click any of the blue assessment grade-level folders to reveal assessments.
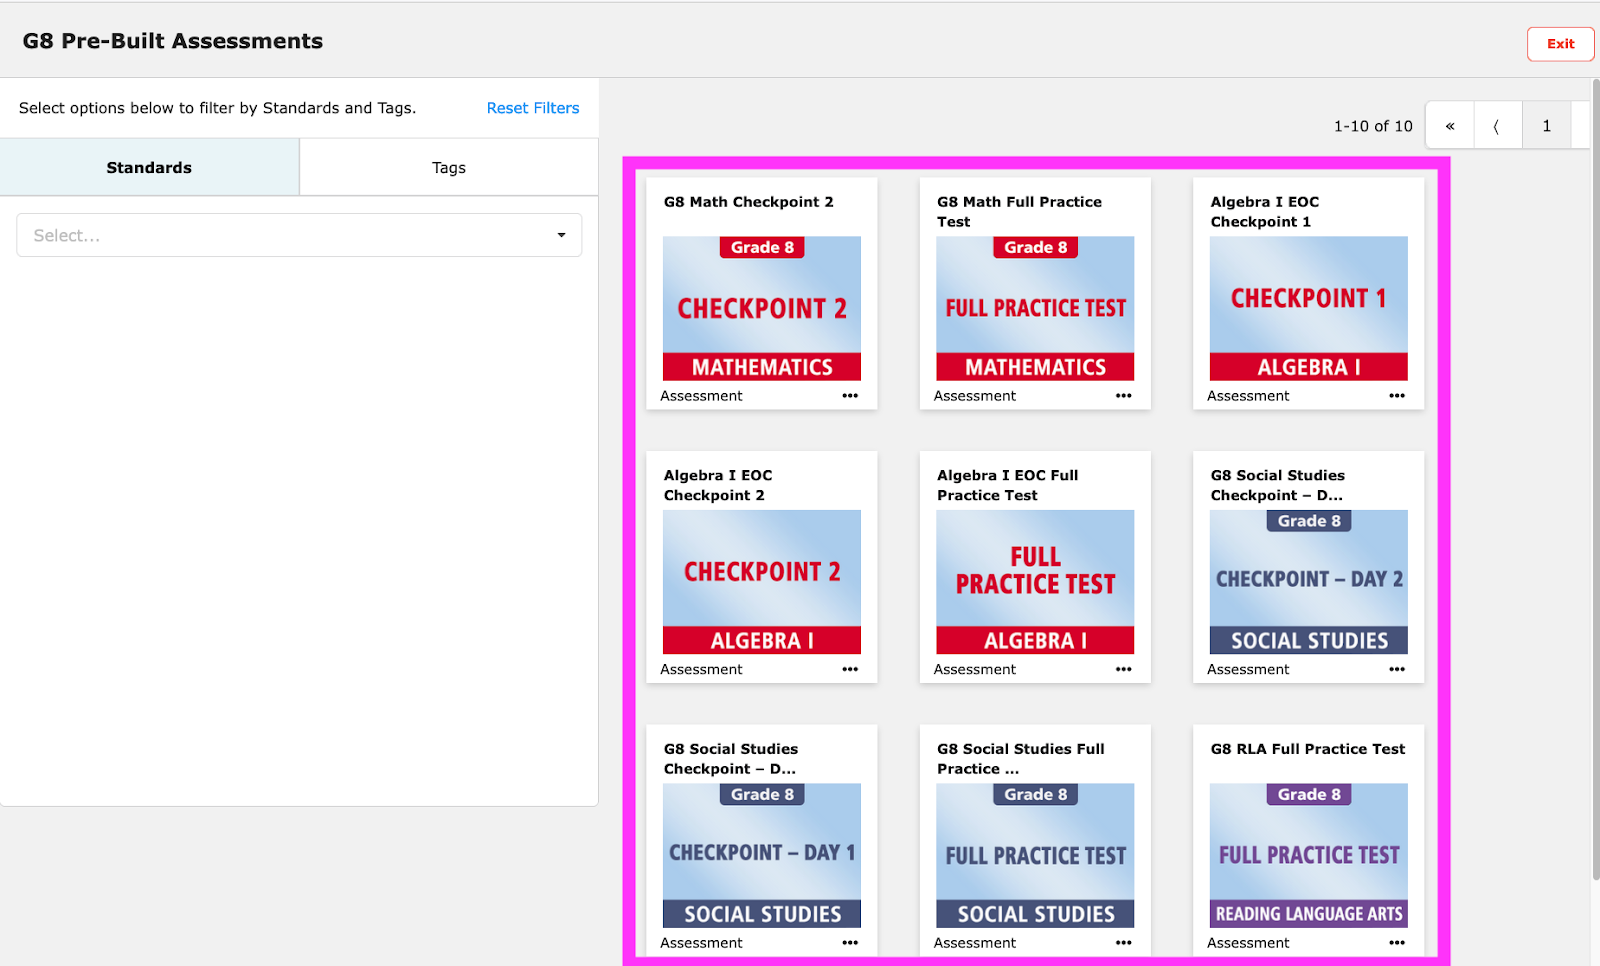
Refine your results among pre-builts using the left sidebar Standards and Tags filters.
We’ll cover the method for directly sharing, customizing, or publishing pre-built tests below.
Test Builder Tab
Main Interface
Test Builder consists of three workspaces: My Drafts, Shared Drafts, and Live.
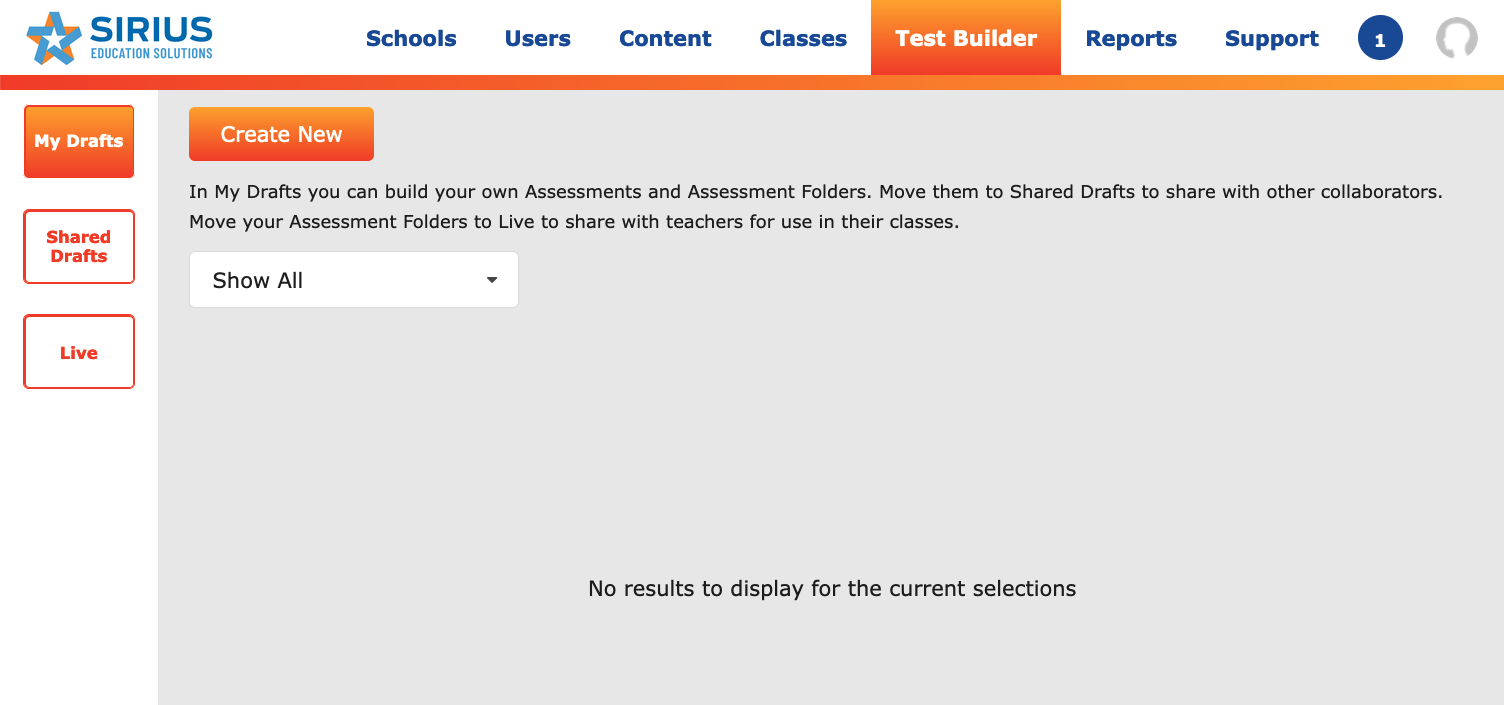
Assessment administrators spend the vast majority of their time working in My Drafts content/assessment folders and drafting assessments.
Shared Drafts is a place to collaborate on assessments with colleagues.
Live is a space for content that is published for teachers to assign to their students.
My Drafts: Creating Assessment Folders
Getting Started
Though you can begin your work in SSAB by creating assessments, we recommend that you start by creating a main assessment content folder.
Creating a Main Assessment Content Folder and One Testing Period Subfolder (unit)
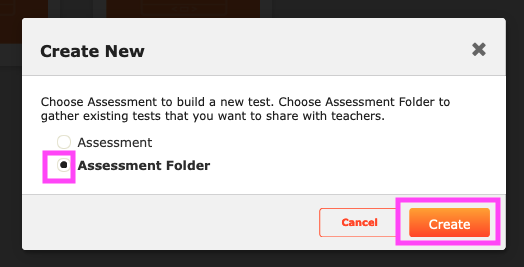
To create a new main assessment content folder, click New, select the button next to Assessment Folder, and then Create.
Add a main assessment folder Name, Description and then Name First Subfolder according to the following suggestions:
Name: Grade level, subject, assessment program
Description: Full District or Specific Schools
Name First Folder: Testing period
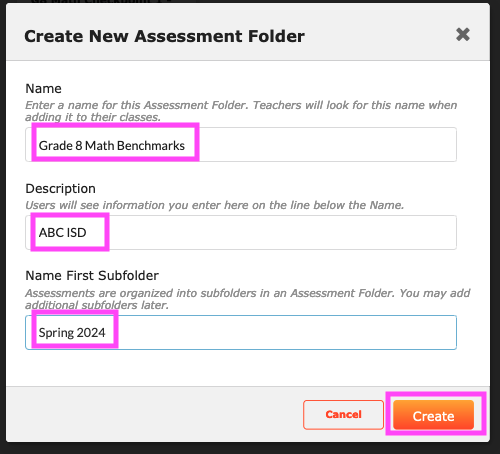
Note: The folder name becomes the “assessment content” that teachers and students will see when they are assigned tests created by assessment administrators. Exercise care in naming the folder as it will also serve as the content folder name in teacher and admin reports in the same way that a Sirius course title appears (especially in Course Report).
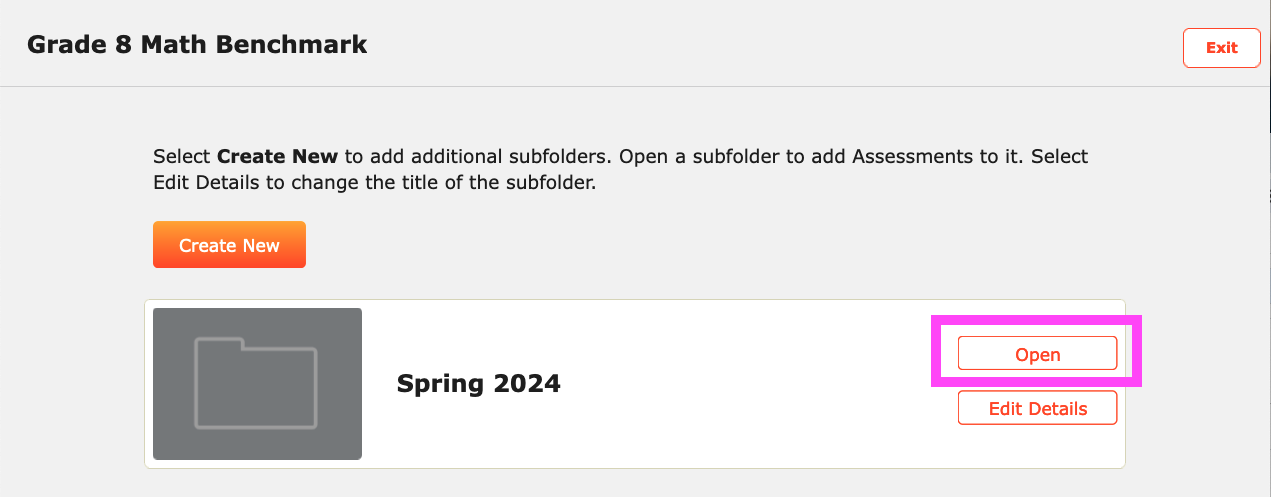
Your folder structure is created and you can proceed to create additional subfolders for distinct testing periods or you can open a subfolder and create assessments directly within/affiliated with those subfolders.
My Drafts: Creating a First Assessment from Within a Subfolder
To create a first assessment within your new subfolder (such as Spring 2024) click the Open button.
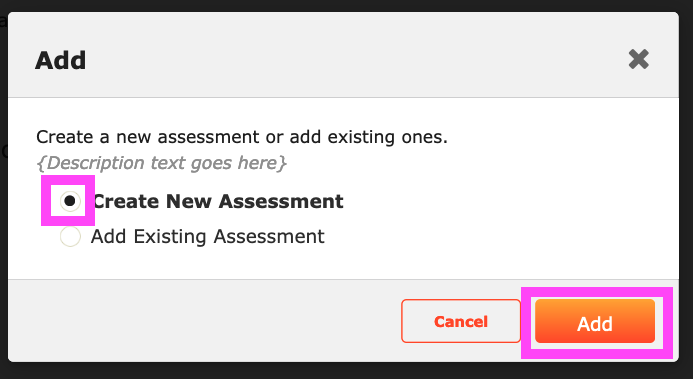
Click the button next to Create New Assessment and then click Add.
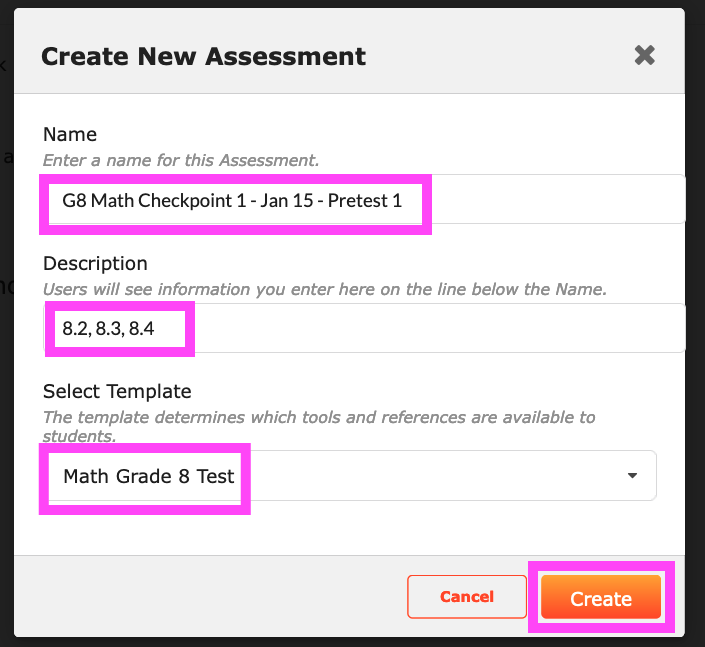
Enter an assessment Name, Description, and Select Template followed by clicking the Create button. Consider the following suggestions:
Name: Grade level, name of test, assignment date, type of test
Description: Standards/TEKs addressed (or topics)
Select Template: Select the appropriate grade level and subject (controls tools in interface)
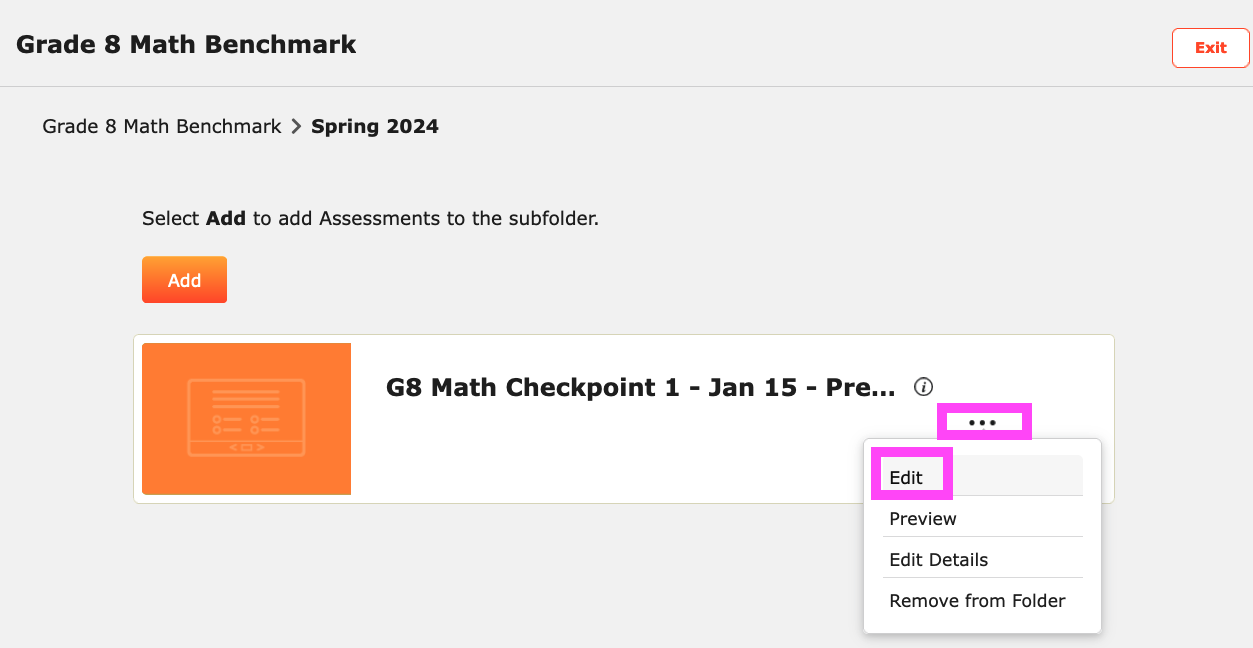
Your test shell/Assessment Card will be added to your subfolder. To add items to your test shell:
Click the meatball kabob (...) in the lower-right corner of the assessment card and then Edit.
Item Selection
As you learned in the Content section, you can locate assessment items by searching through Standards, Tags, or a combination of the two.
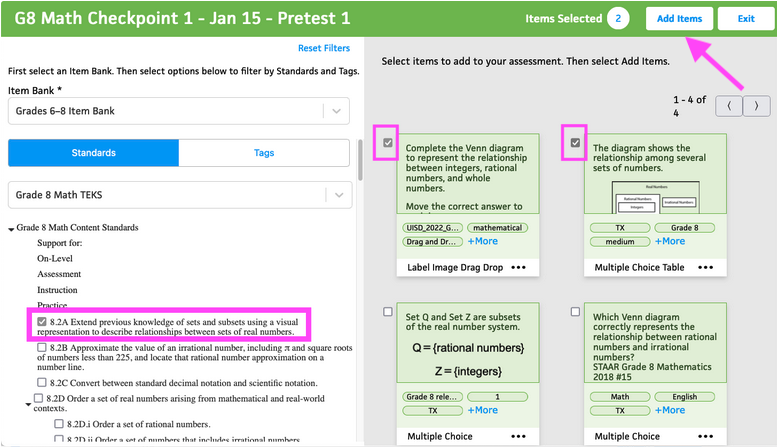
In the example below, the Grades 6–8 Item Bank has been selected, along with Grade 8 Math TEKS as our filter criteria.
In the results area we see the first 1–25 of 1659 items returned as results.
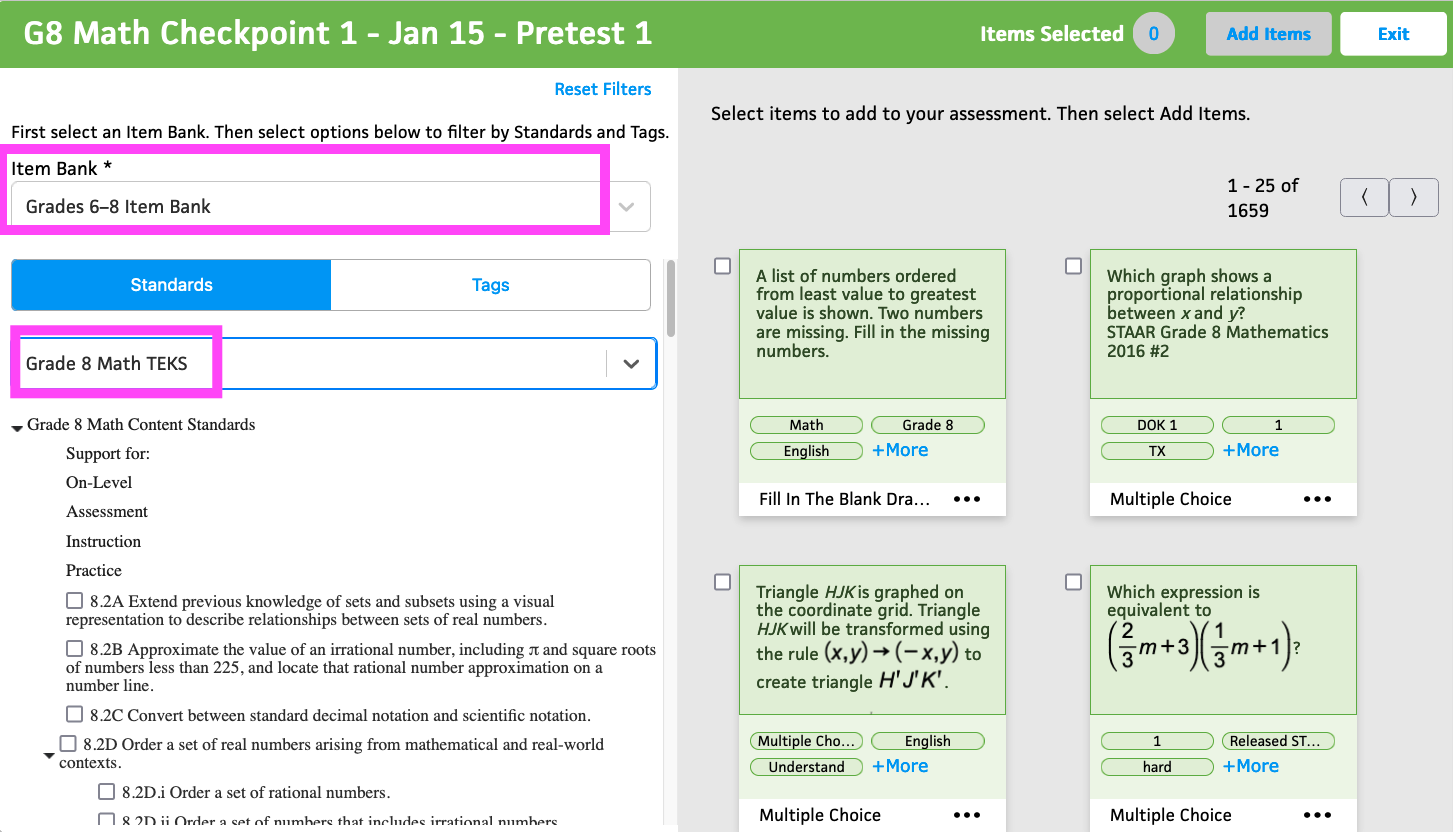
To narrow your filtered results, click one or more checkboxes next to individual standards.
Note: If you are devising a test containing items for more than one standard, you can select groups of questions individually by selecting one standard at a time.
In the example below, the author has selected Standard 8.2A and the first two questions via checkboxes in the upper-left of the item card.
As you learned earlier, you can also evaluate each item individually by clicking +More or by rolling over the item card meatball kebab to either preview or view the (+More) information.
Once you’ve selected items, click the Add Items button in the upper-right to place them in your staging bin.
Your staging bin is an area on the left side of your screen where you can examine the items more thoroughly before you place them in your test.
Once you’ve collected the selected items in your bin, you can add them to your test by either:
Selecting each (+) button near the bottom of each item; or
Selecting the (+) Place all items shown below option.

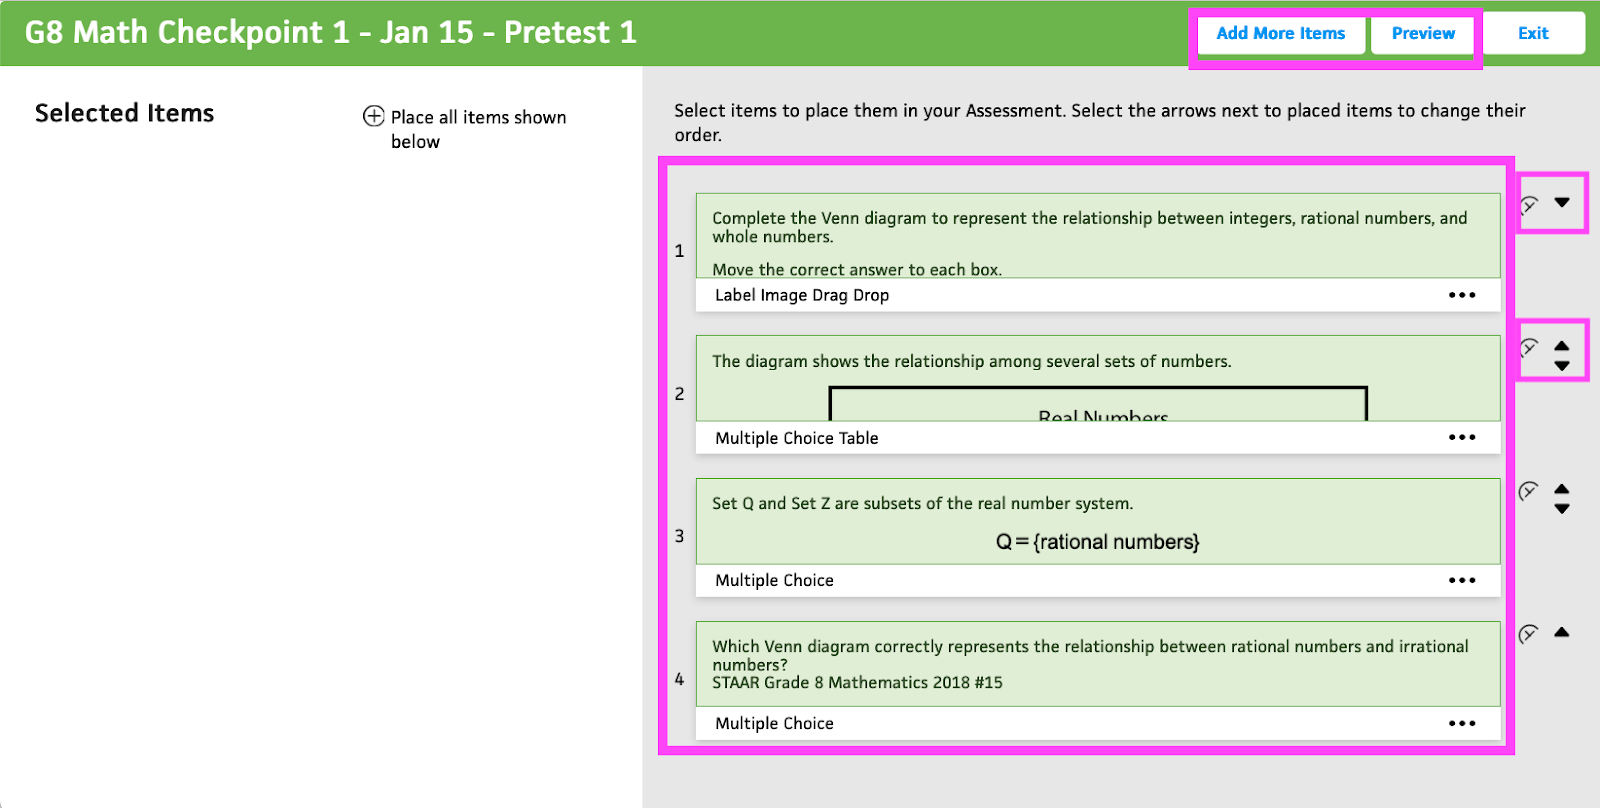
Your selected test items now appear stacked in the right main field on the screen.
Note: Your items will appear in your test according to the sequence you selected. If you select to place all items as shown below, you’ll see them in the same order they displayed in the bin.
Resequence items using the up/down arrows to the right of each question/item, or you can eliminate an item by clicking the (x) next to it. You can also choose to Add More Items, Preview, or Exit in the upper-right.
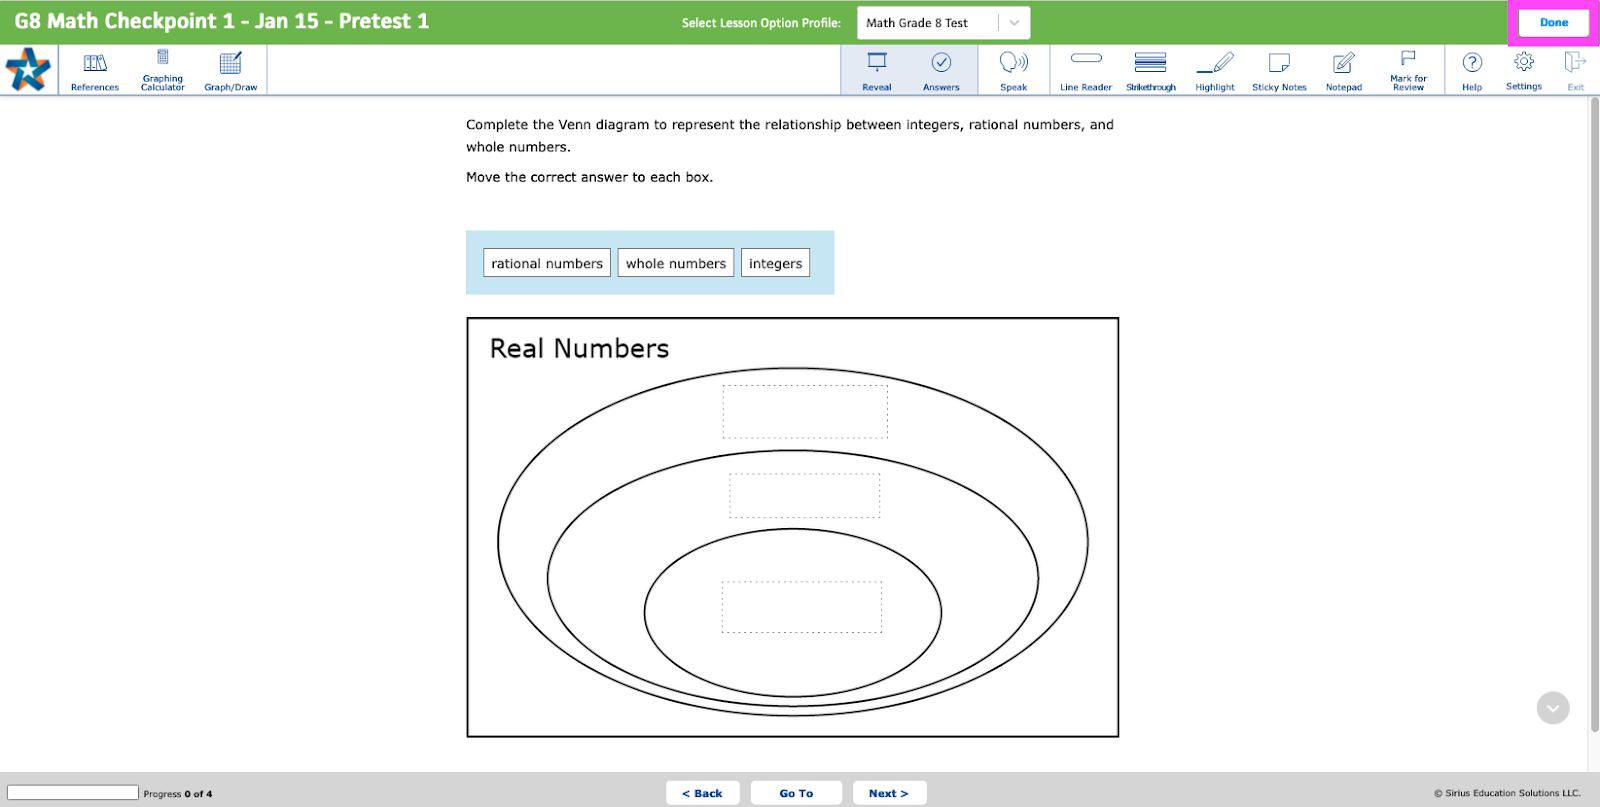
Below are two examples found in Preview mode.
As with any assessment or activity, click the Next button at the bottom of the screen to navigate to the next screen in your assessment preview.

Click the Done button in the upper-right to close the preview.
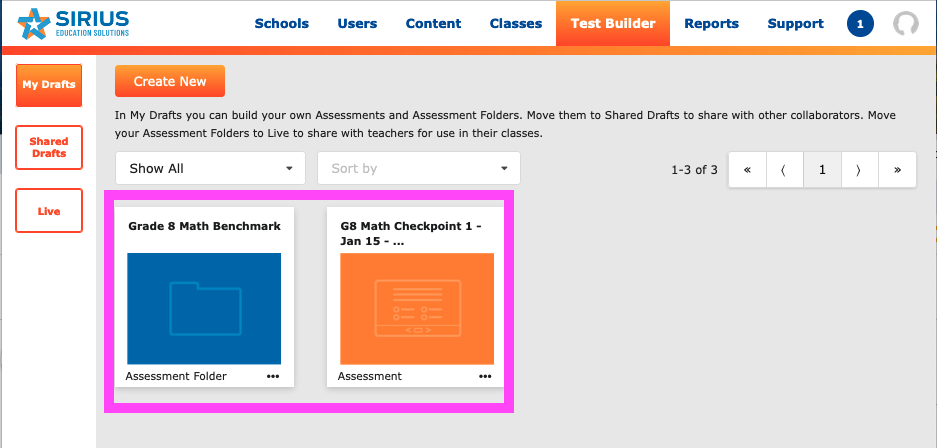
Lastly, you’ll note that your new assessment appears next to your main assessment content folder in your My Drafts screen.
Building Assessments with “Passage with Items” or Multipart Items (RLA, E1, E2)
Building assessments with RLA “Passage with Items” uses exactly the same method as above. If you are adding more than one passage, you’ll have the option to edit or resequence.
The steps you will use follow:
Create your test shell (Name, Description, Template).
Edit your test. Select one or more “Passages with Items” activities from the item selection screen. Note that the Item Card lists Passage Activity as its activity type at the bottom of the card.
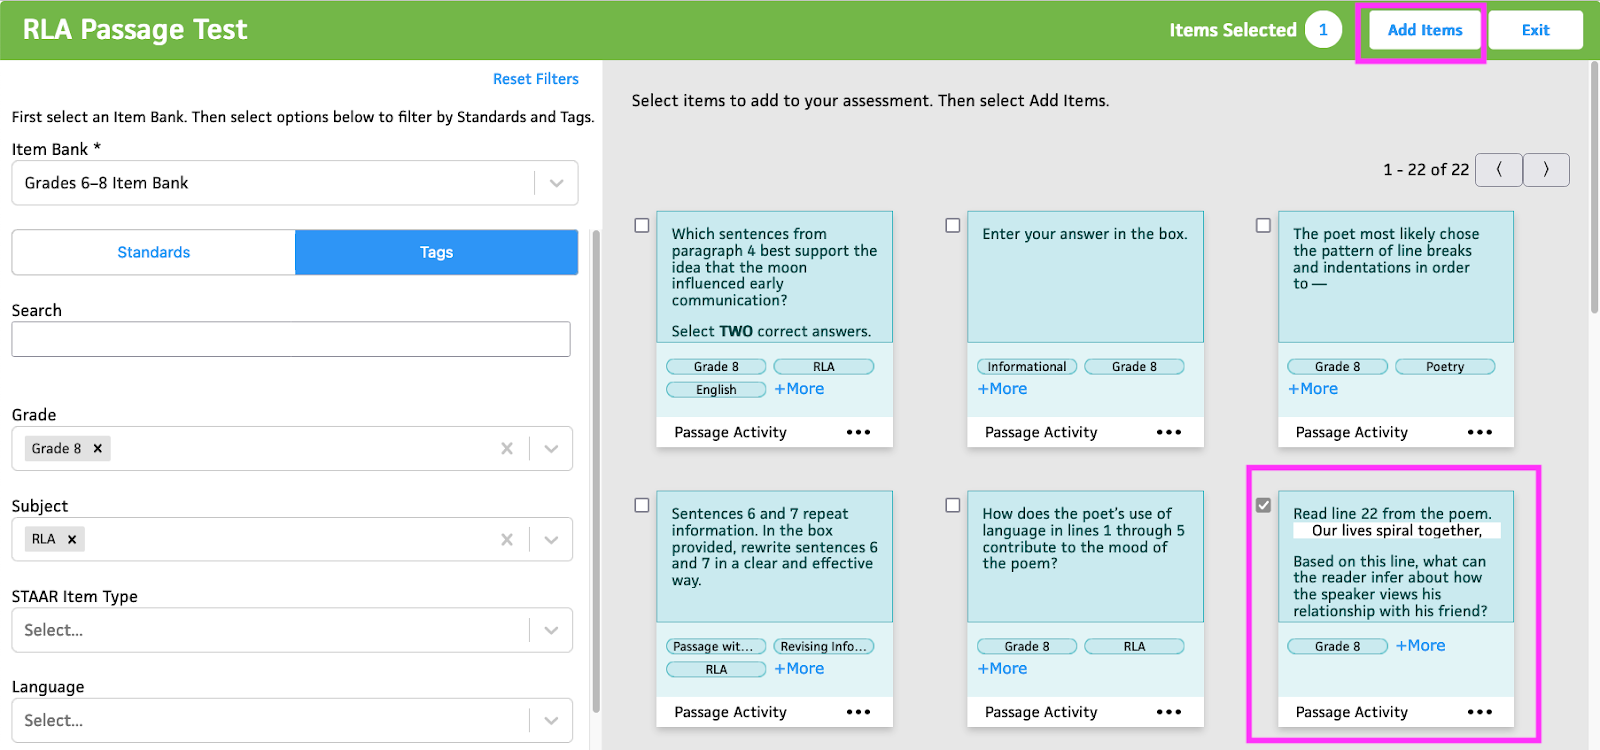
The passage activity appears in your test’s bin. Place the passage activities in your test by clicking one of the plus signs.

Note: You can add more than one “Passage with Items” activity to an assessment; they will show up as different sections when you preview your test.
Select and deselect items from your “Passage with Items.” When you’ve narrowed down your choice (or if you’d like to include all items), click Add.
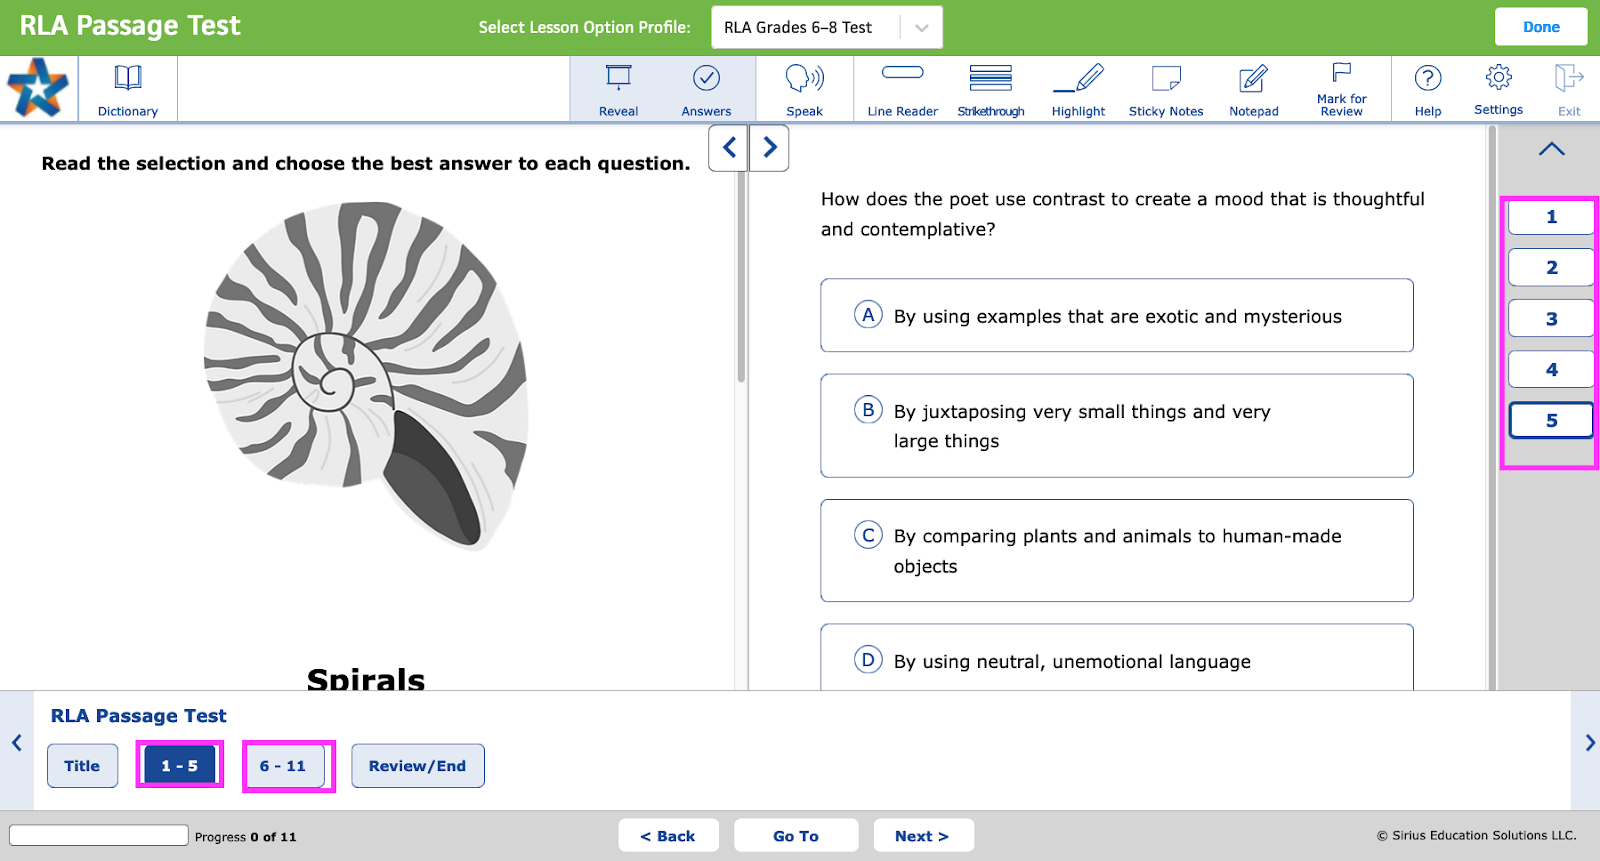
Preview your “Passage with Items” assessment. You’ll see the passage in the left panel with questions in the right panel. Use the numbered menu on the right to navigate among a passage’s items. If your test contains a second passage, you’ll see a second grouping of question items in the Go To menu.
Moving Drafts to Shared Drafts and Other Options
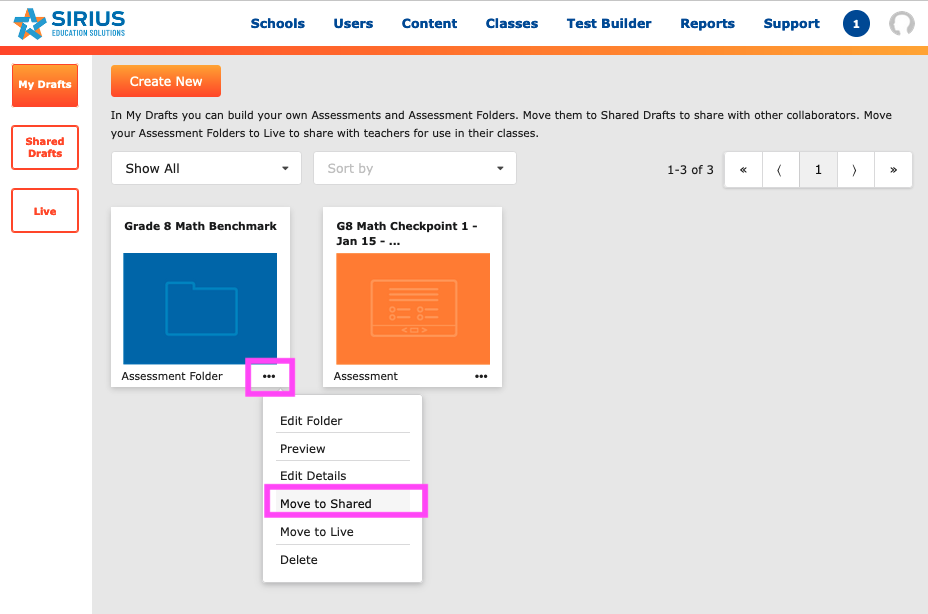
You can move a blue folder and its contents from My Drafts by rolling over the meatball kebab in the lower-right of the assessment folder card to review your options:
To move a draft blue folder and its contents to Shared Drafts, click Move to Shared. This action will allow your colleagues in your district or your school to review your work.
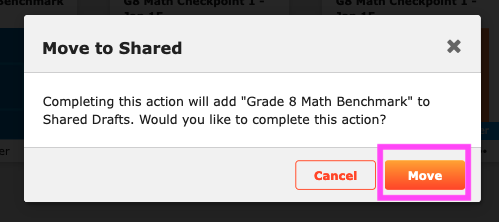
A confirmation message asks you to confirm your choice to Move to Shared by clicking the Move button.
As other items in the folder card menu suggest, you can:
Edit Folder: View or add subfolders or assessments
Preview: Preview folder structure
Edit Details: Edit folder name or description
Move to Shared: Colleagues view/review/collaborate in Shared Drafts
Move to Live: Publish folder to teachers containing current assessments
Delete: Delete the folder and contents at this stage; however, this action cannot be undone. Also once you move a folder to Live, it must remain live.
Alternatively, you can move orange individual assessments to Shared Drafts if they are not associated with a main folder or program.
Note: Above we created an assessment directly in a subfolder to associate it with the main folder and subfolder as part of our workflow. Assessments can also be created independently and moved to live independently, and we’ll examine that method in a section below.
To move an orange individual assessment to Shared Drafts (i.e., ones not associated with a folder), roll over the assessment’s meatball kebab in the lower-right of the assessment card to reveal the context menu and select Move to Shared.
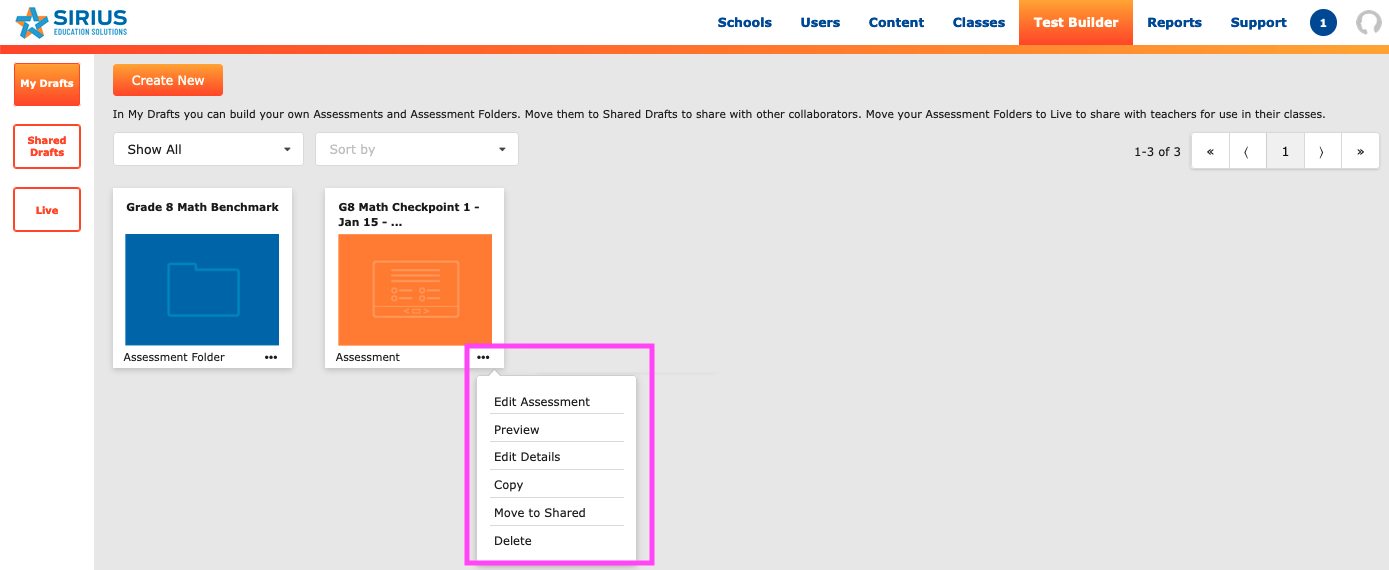
As other items in the assessment card menu suggest, you can:
Edit Assessment: Add, remove, or resequence items in your assessment
Preview: Preview the assessment
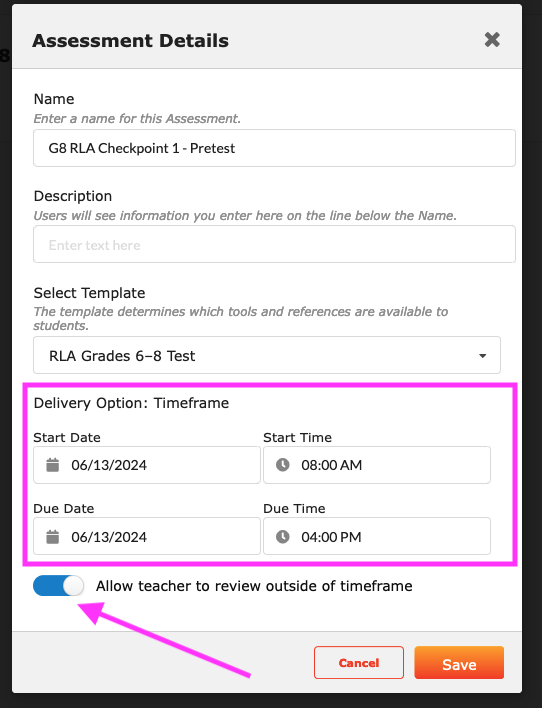
Edit Details: Edit the Assessment Name, Description, or Select a New Template. NEW in Summer 2024, you’ll have the ability to add a display start and end date time frame that allows you to control when teachers see the assessment for assigning and/or administration.
Copy: Clone and rename an assessment that you’d like to reuse for another purpose
Move to Shared: Colleagues view/review/collaborate in Shared Drafts
Delete: Delete the assessment at this stage; however, this action cannot be undone. Also, once you have moved an assessment into a live folder, it must remain live.
Suggestions for Working with Shared Drafts
Ready for Review: Notify colleagues via email on your team that your work is available in Shared Drafts and ready for review, revision, and/or approval.
Promotion to Live: Once assessments folders containing assessments are ready to be administered by teachers, one admin/team leader should be charged with moving Folders and Assessments to Live for use by teachers and students on or before a given test date.
Transmittals to Teachers Administering Tests. Notify teachers via email of the new Assessment “Course” Folder and specific assessments that are ready or ones that will appear in the subfolder. Provide exact folder and assessment names to teachers, including ideal testing dates as well as any other special assignment settings or details to observe (for example, you might ask teachers to not share results with students).
New Additions to Live. Assessment administrators can add assessments to the live folder when they are available. We’ll review that specific method below.
Moving Main Assessment Folders to Live
Once everyone on your team has had a chance to review and finalize the assessment folder and first assessment in Shared Drafts, the team lead should promote the main folder and first assessment to Live.
In Shared Drafts, roll over the meatball kabob to expose the menu items.
Shared Drafts include similar options to those you have seen in My Drafts.
Click Move to Live.
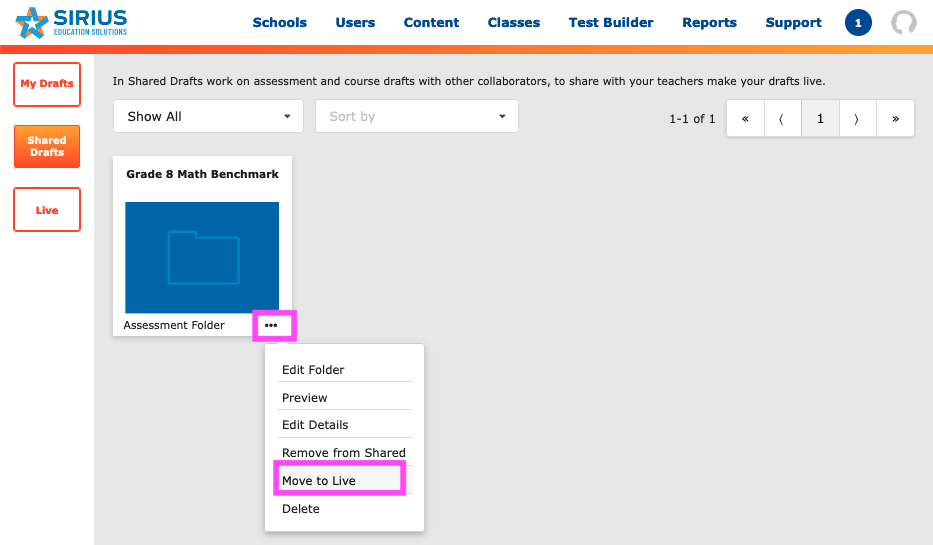
Take note of the message, consider whether you are ready to go, and, if so, click Move.
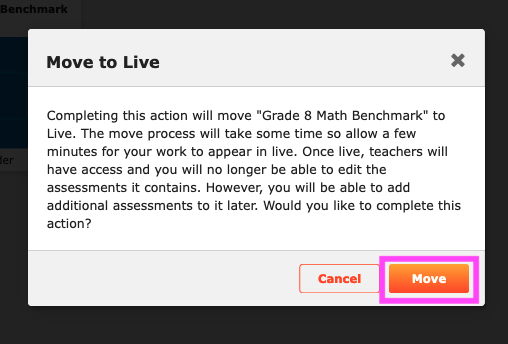
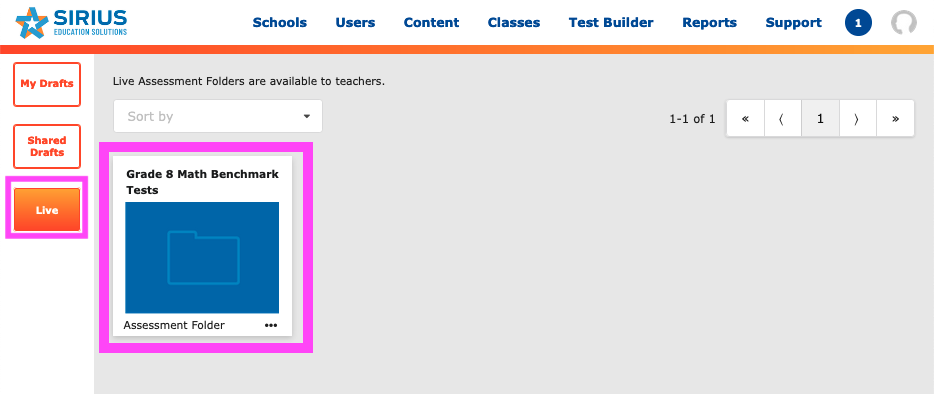
After a short wait, you will find that your new main assessment content folder has been indexed and moved to Live (including assessments) and is now available for teachers to add to their classes.
Assisting Teachers Who Need to Add SSAB Assessment Folders to Their Classes for Test Administration
Sirius STAAR Assessment Bank & Test Builder Teacher Resources
Adding Assessment Folder Content to Sirius (SSAB: Teachers). A one-pager on how teachers add assessment folder content created in SSAB.
Assigning Assessments in Sirius (SSAB: Teachers). A one-pager on how teachers assign assessments created in SSAB to students.
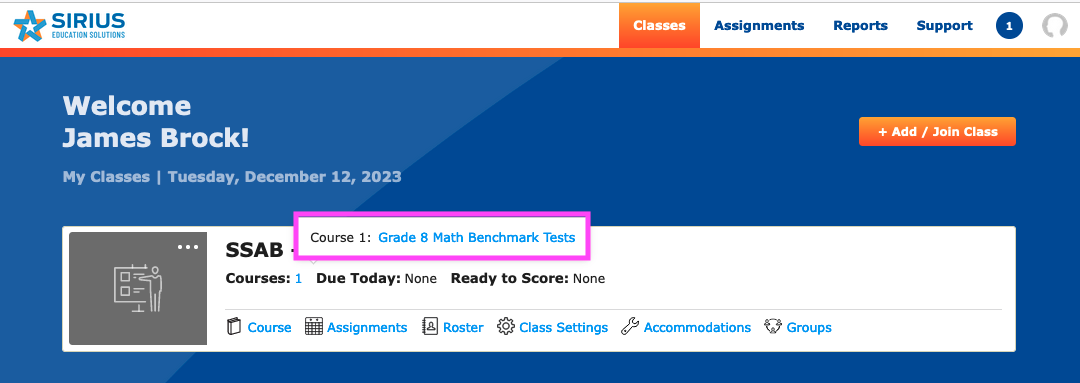
On a teacher’s class card, they click Course.
On the Add Course screen, they click the Add Content button in the upper-right.
Teachers then click the checkbox next to the new assessment content folder and then Save.
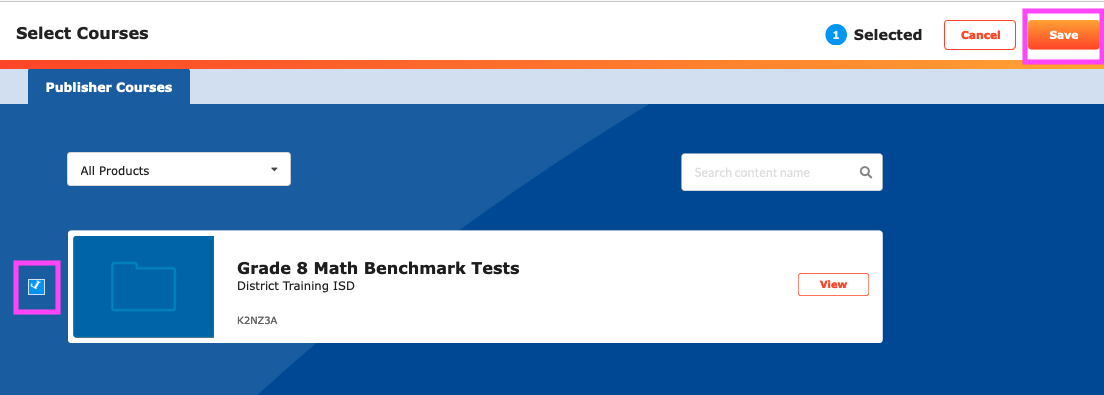
Teachers confirm the addition of the new assessment content folder as a program associated with the correct classes.
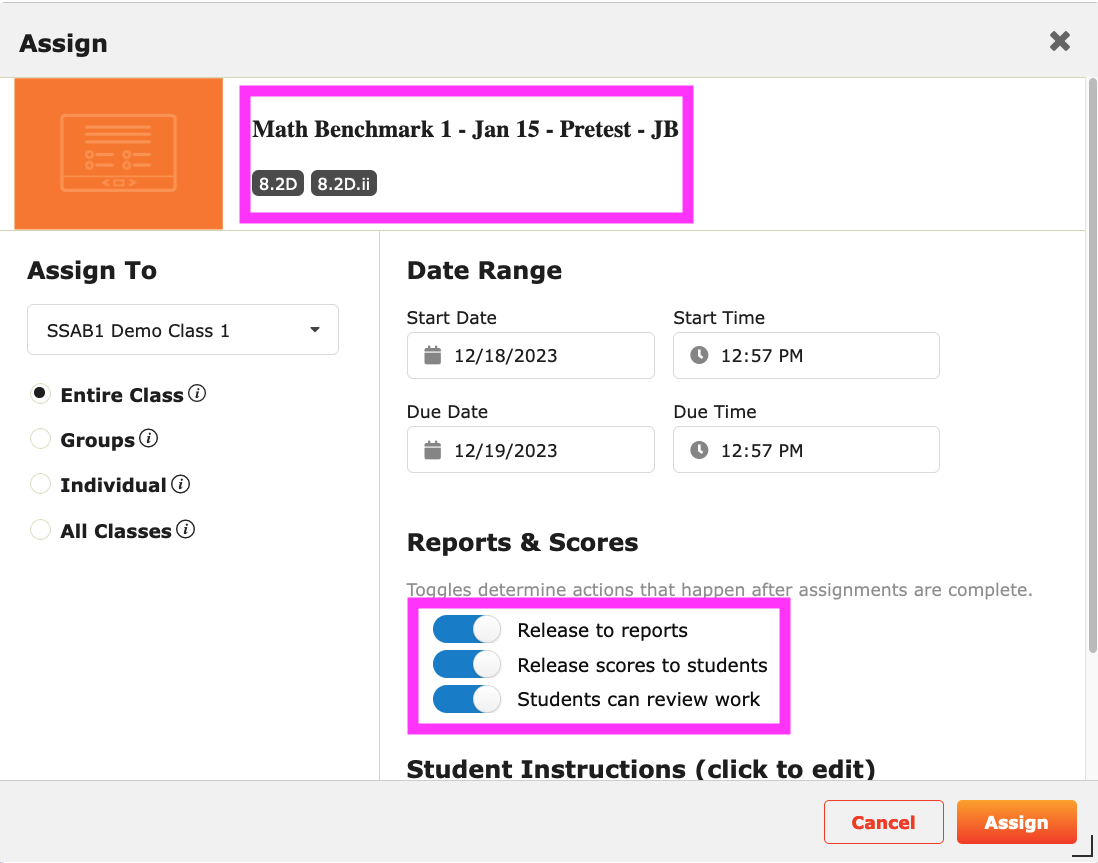
Then, teachers assign assessments from the content folder, as they would any tests or activities from their main Sirius Online courses by following the detailed and specific instructions you give to them.
Teachers may use any combination of assignment toggles as you recommend to them, including:
Release to reports
Release scores to students
*Students can review work
Note: Administrators may consider asking teachers to set the “Students can review work” to off.
Creating Additional Assessments
Once your main assessment content folder has gone live, use the following method to create additional assessments and add the tests to your live folder.
In My Drafts, click the Create New button at the top of the screen, and click the button next to Assessment, and then Create.
Filter for items, add them to the test’s bin, and then place them in your test. You can reorder or remove any items (or add additional new items) prior to completing your work.
When you’re ready, move the assessment into Shared Drafts and let your team know that the assessment is ready for review.
Adding New Assessments to the Live Main Folder
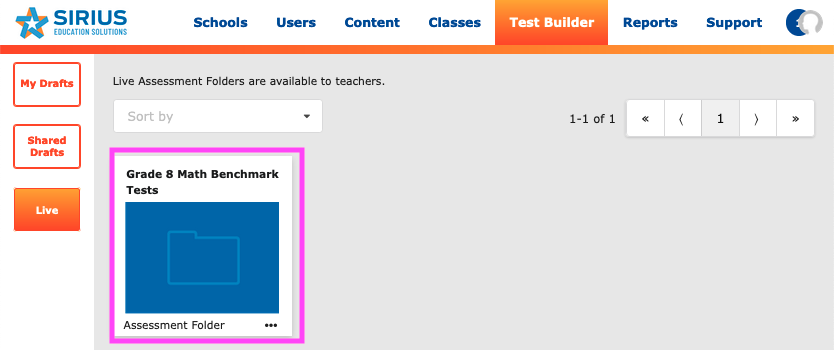
In the Live section of Test Builder, click the main assessment content folder to which you’d like to add your new test.
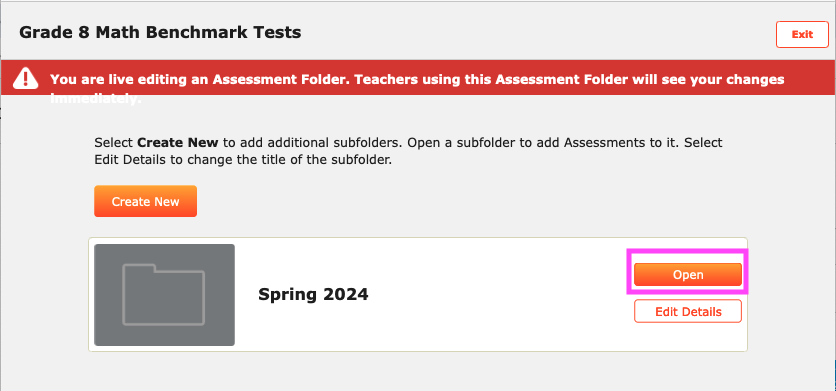
Click the Open button on your subfolder (testing period) folder.
Select the location of the test you plan to add to the Live folder. In the case below, we’ll add a test from the Shared Drafts location.
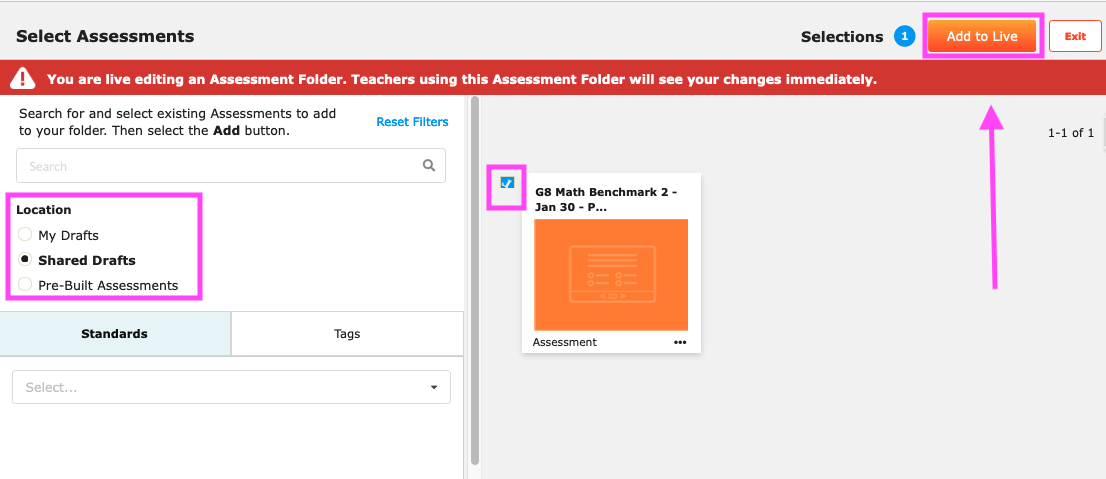
Designate the location in the left panel by clicking the button.
Click the checkbox next to the test you’d like to add in the right panel.
Click the Add to Live button.
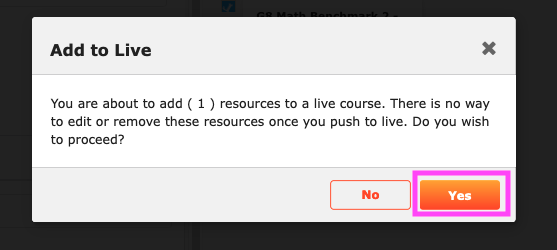
Your test will now appear in the period subfolder.
Note:
Assessments can be added from My Drafts, Shared Drafts, or as/from Pre-Built Assessments. We’ll cover working with pre-built assessments next.
Working with Pre-Built Tests
You can add pre-built assessments directly to your Live folder if you plan to use them “as is” versus modifying them. You can go to your live course subfolder and add a pre-build test, for instance, and teachers in your school will be able to assign it directly.
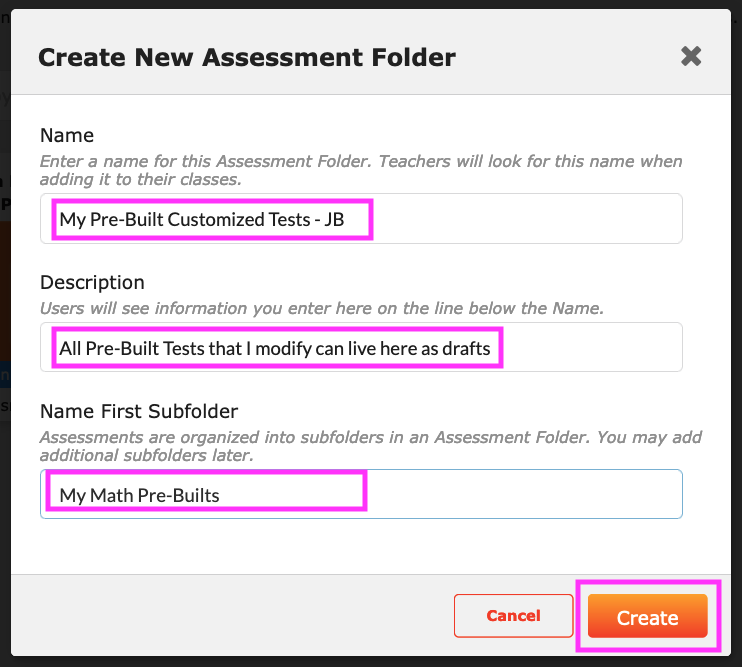
If you would like to modify any pre-built tests (an advanced skill), you’ll need to create a draft of a new main assessment content folder and subfolder in My Drafts, and call the draft folders using terms associated with “modified pre-built tests,” for instance, and your initials.
Create a new assessment folder entering a Name, Description, and Name First Folder, and then click Create.
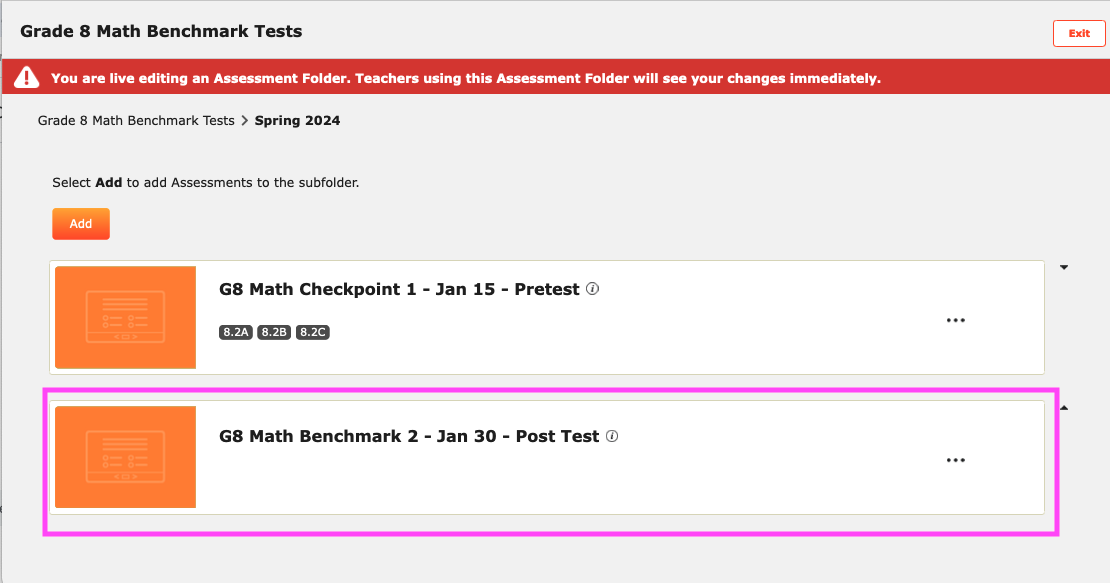
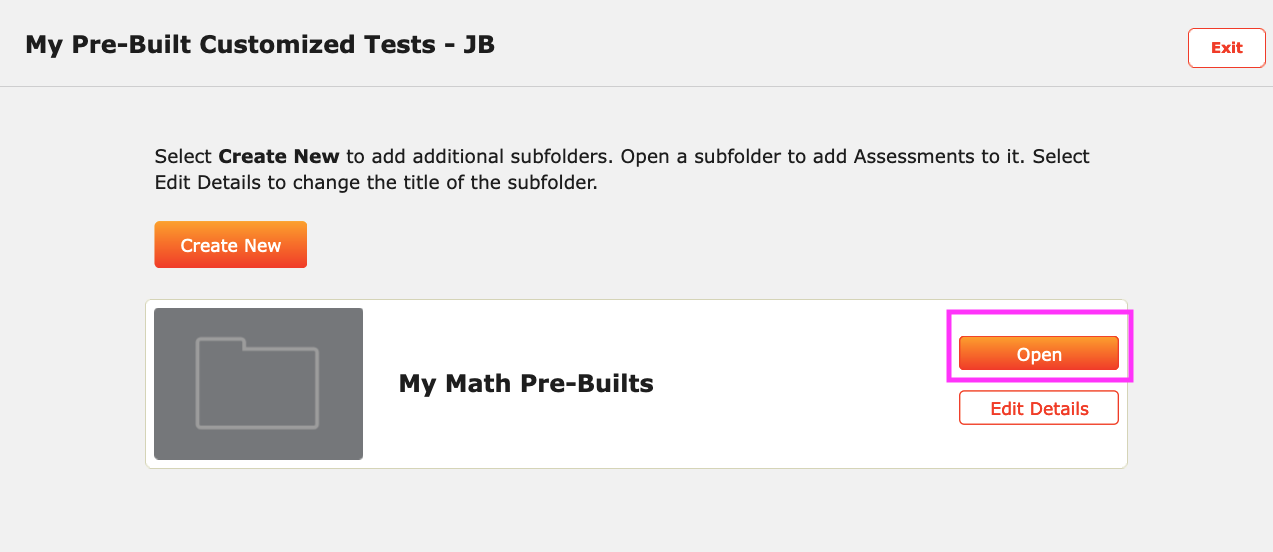
Click the Open button in your subfolder. The example below is for Math pre-built assessments.
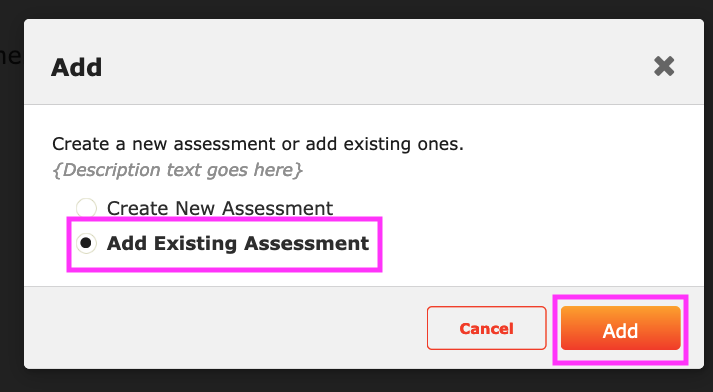
Click the Add button.

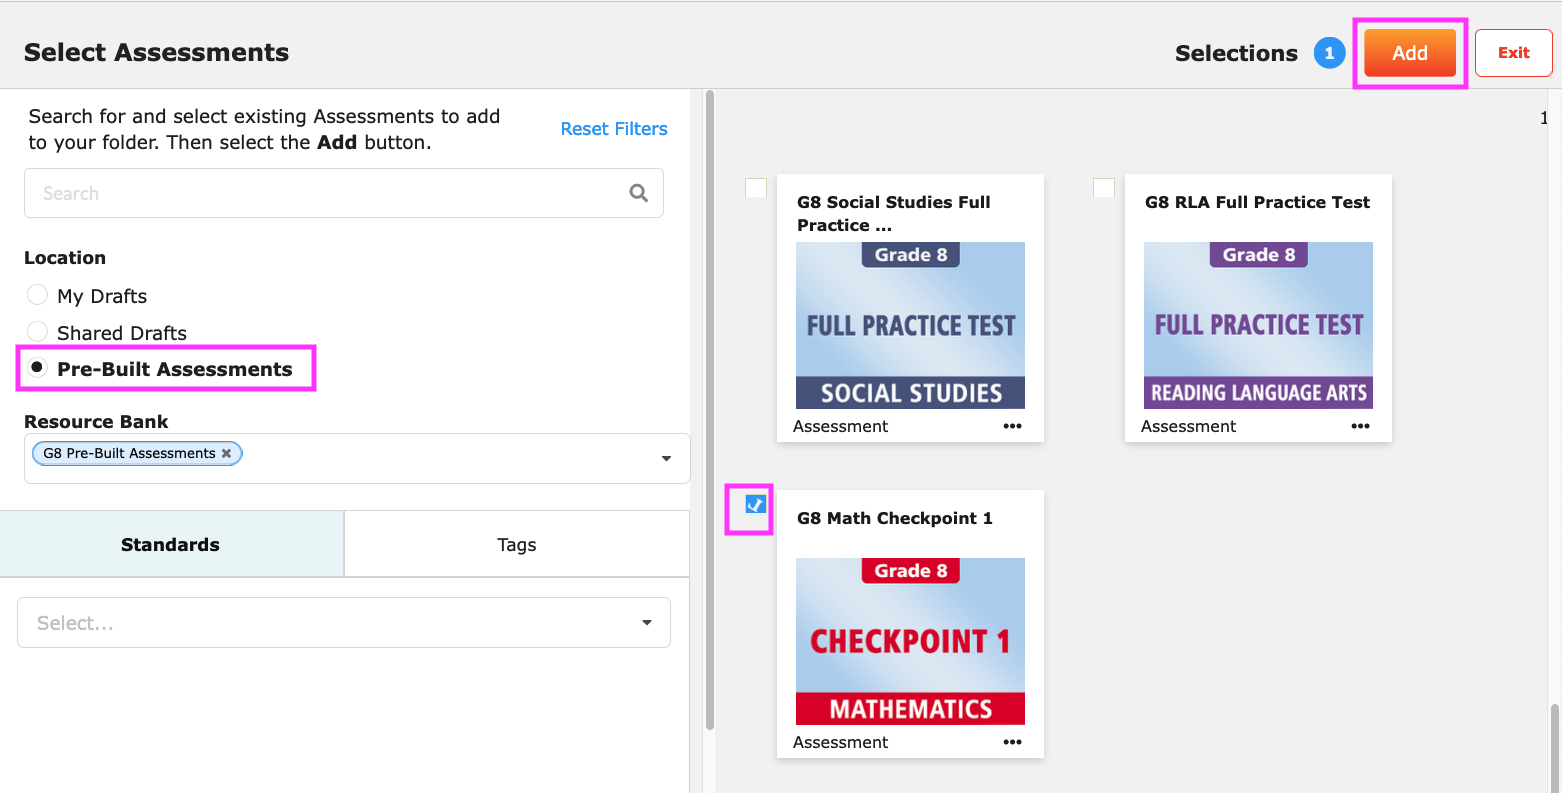
Click the button next to Add Existing Assessment and then click Add.
Select the Pre-Built Assessments Location and locate the grade-level program in Tags that you’d like to work with. In the example below, Grade 8 Math Checkpoint 1 has been selected. Then click the Add button.
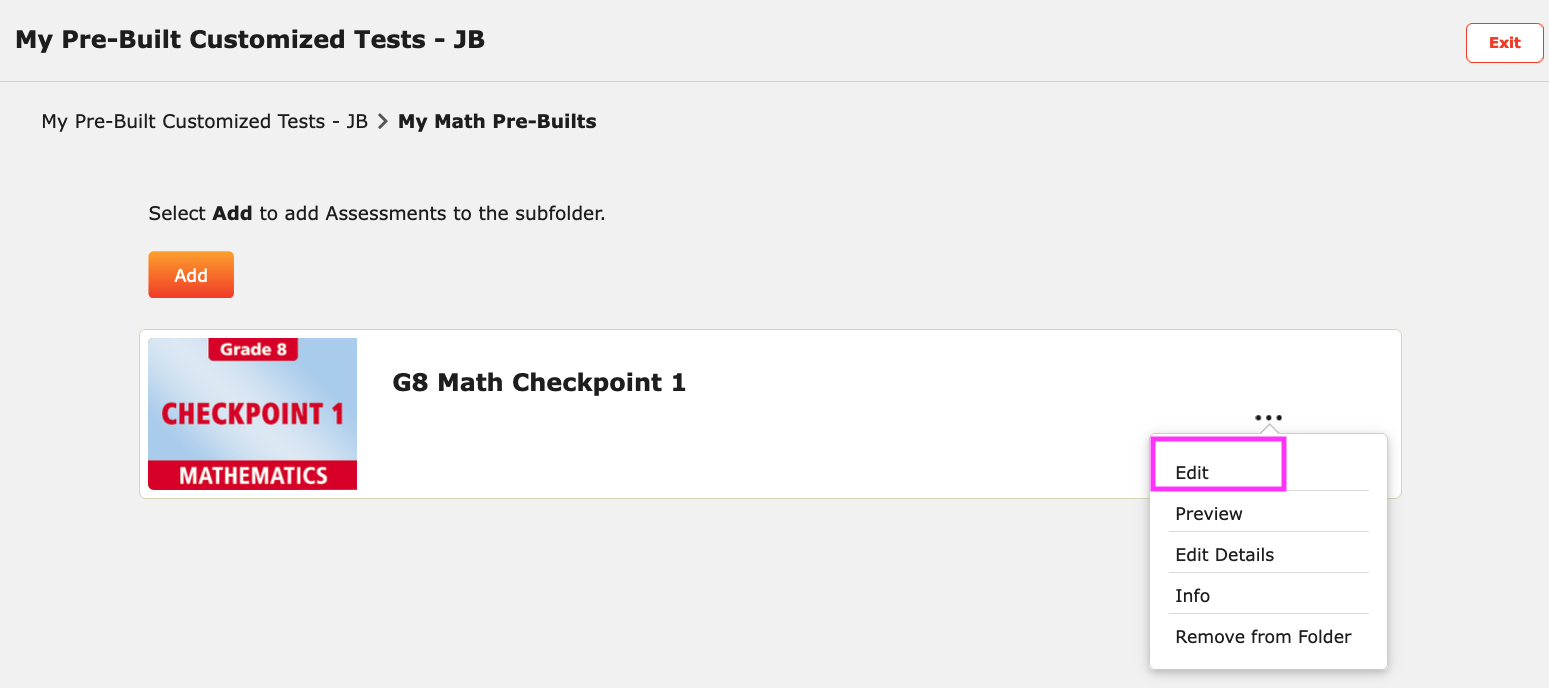
Open the meatball kabob and click Edit.
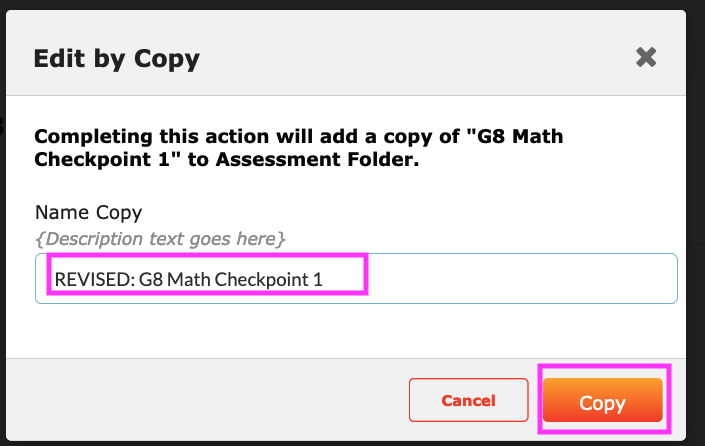
Revise the name of the test in Edit by Copy. In the example below, the term Revised is used. Then click Copy.
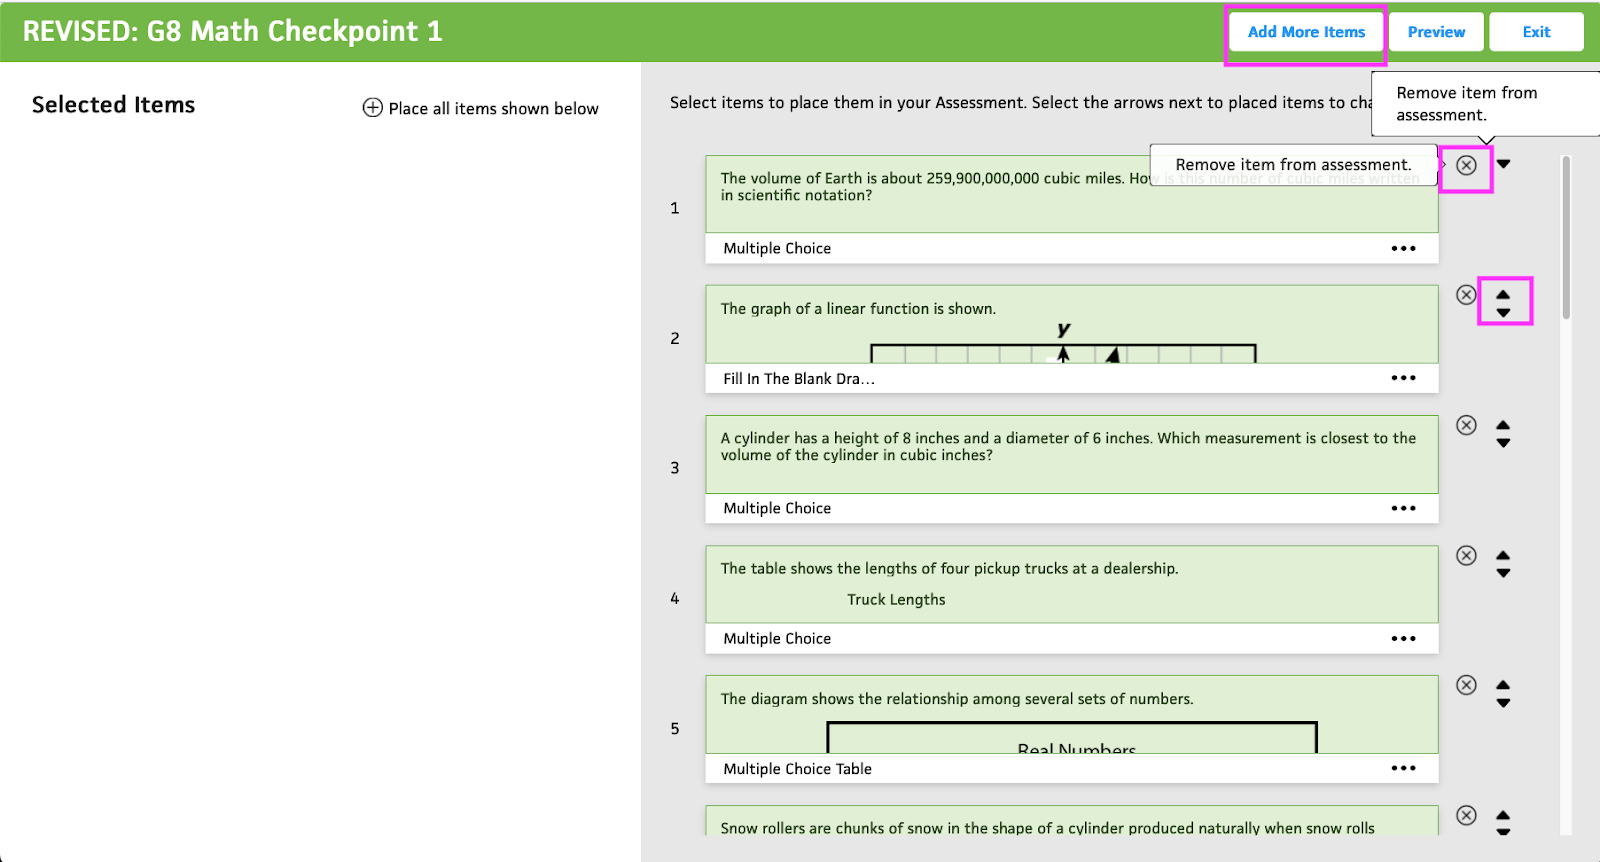
Your copy of the pre-built test is added to the folder. At this point, roll over the meatball kabob and click Edit.
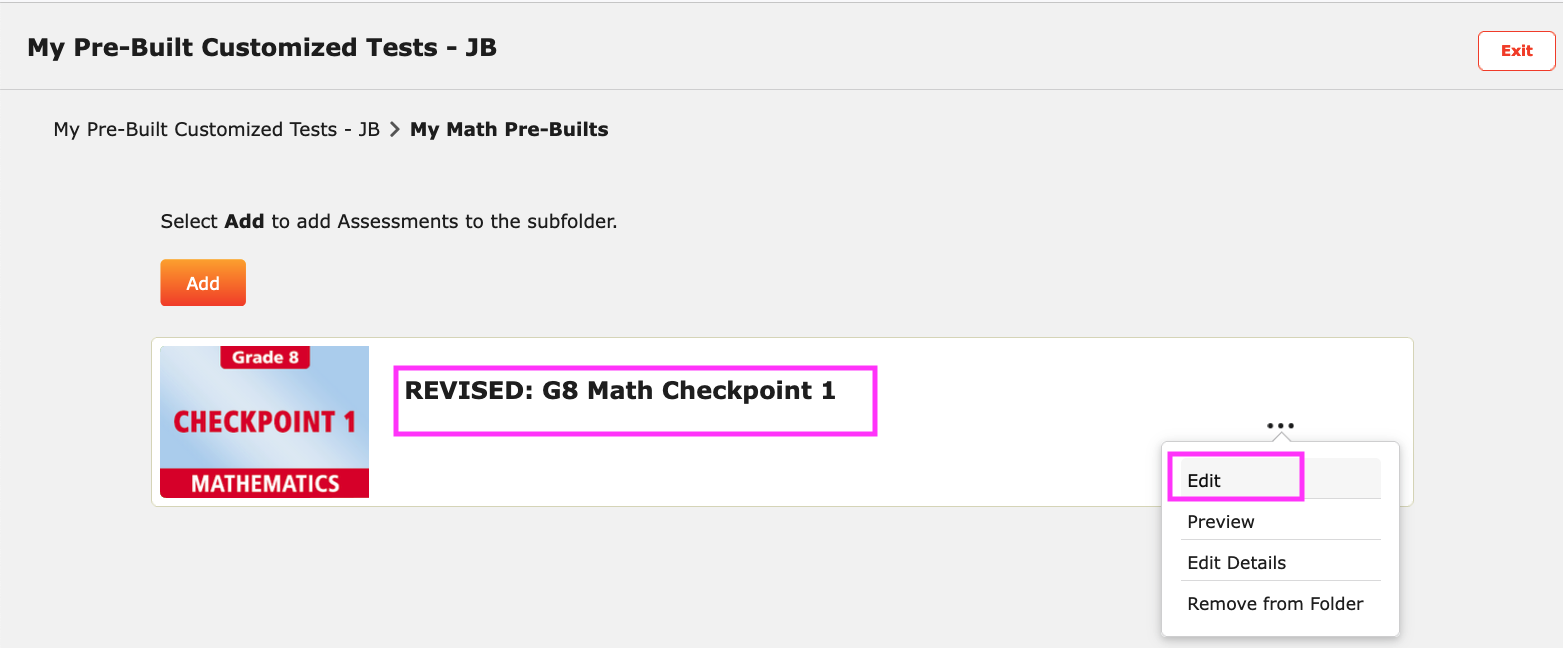
You can now remove items from the copy of the pre-built test by clicking the (x) icon. You can also reorder the items using the Move Up or Down arrows. You can also choose to Add More Items to your pre-built tests, Preview, or Exit.
Your completed test can now be moved to the Shared Drafts or to the Live folder if you’re ready for teachers to assign the test.
Final Words
Thank you for consulting this guide, especially if you are using it after attending SES 301—Building and Publishing Assessments Using Sirius STAAR Assessment Bank and Test Builder.
Stay tuned for notifications (in the notifications icon) as we roll out even more powerful features in support of your assessment and benchmarking needs.
Appendix 1: Test Builder Training Resource/Job Aid (SES 301)
Related Articles
Sirius STAAR Assessment Bank and Test Builder (SSAB & TB): Frequently Asked Questions (FAQs) (102424)
The following Frequently Asked Questions (FAQs) and responses aim to provide quick, easy to digest information relating to our new Sirius STAAR Assessment Bank and Test Builder product (SSAB & TB). When was SSAB launched? When did it become available ...SSAB Test Builder Training Resource/Job Aid - (DA's and SA's) - SES 301
For Customers who have purchased SSAB Test Builder at the District or Campus level. For District and School Admins/Staff who are involved in Benchmark Test Creation; For those who have participated in SES 301.Sirius Online ©2024–25 How to Use Guide: Teachers, Co-Teachers, Tutors (092724)
Target audience: Teachers, course and subject-specific coaches and coordinators, administrators. Introduction Welcome to Sirius Online ©2024–25! This document contains all the information educators need to be successful in implementing and managing ...Sirius Online Frequently Asked Questions (FAQs)
The following Frequently Asked Questions (FAQs) and responses aim to provide quick, easy to digest information relating to Sirius Online. Getting Started with Sirius Online I'm not seeing my classes created in Clever, Classlink, or EdLink? Who do I ...Sirius Online ©2024-25 How to Use Guide: District and School Administrators (101624)
Sirius Online ©2024-25 How to Use Guide: District and School Administrators Achieving Success Involves Active Hands-On Experience About This Guide This guide is designed for district and school administrators (DAs and SAs) responsible for purchasing, ...